When the crisp air settles in and twinkling lights begin to appear on every porch, it’s the perfect signal to bring your yard to life with handmade holiday magic.
These 23 stunning DIY Christmas trees are more than decorations, they’re a personal expression of joy that turns your outdoor space into a festive wonderland.
You don’t need fancy tools or a big budget. With a bit of creativity and a few natural or upcycled materials, you can build show-stopping trees that welcome every guest with warmth and cheer.
Get ready to craft something unforgettable because nothing says holiday spirit quite like a handmade Christmas tree shining under the winter sky.
#1. Twinkle-Touched Branch Cone Trees
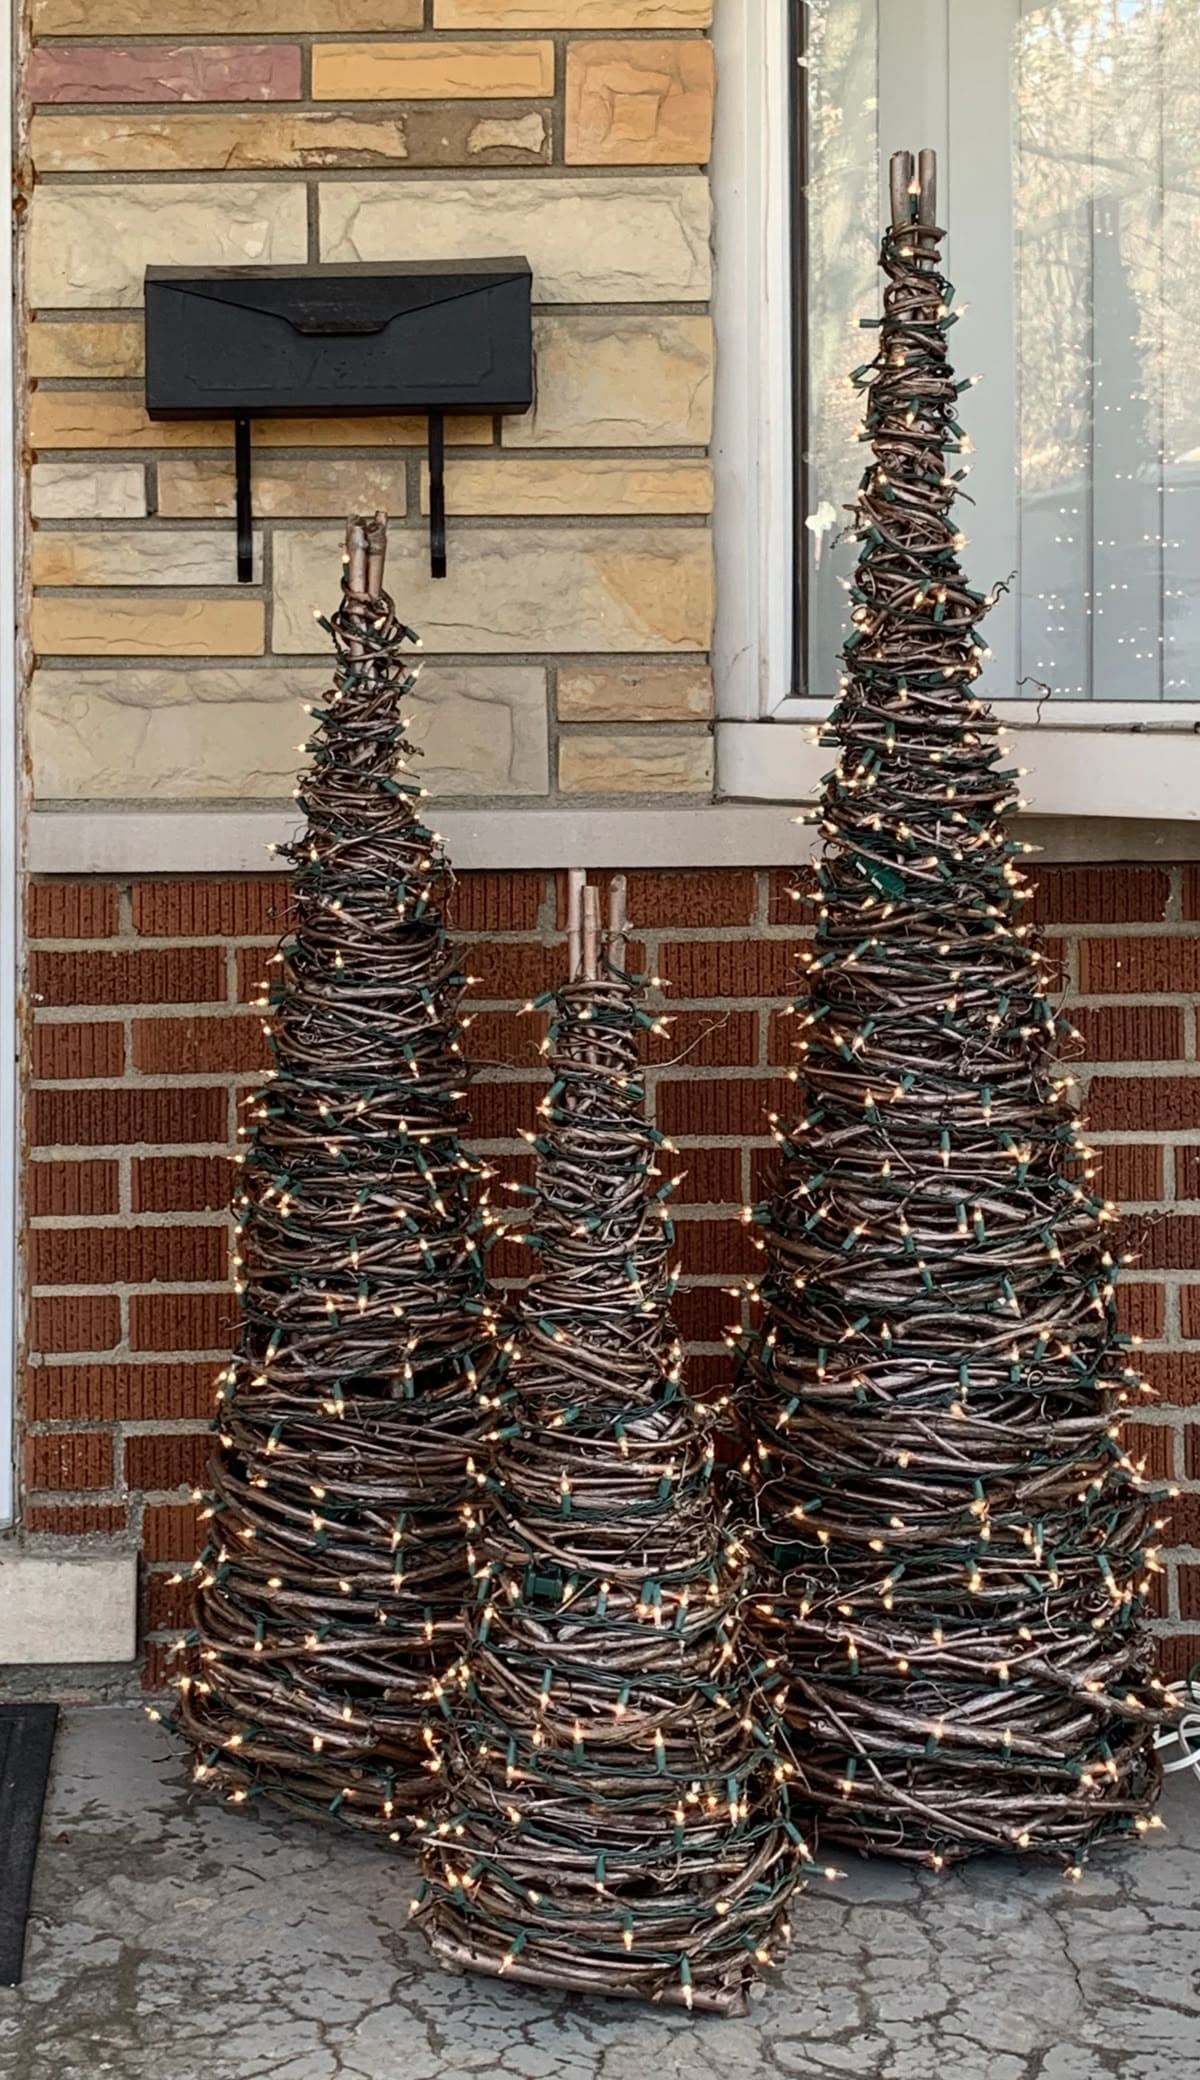
This trio of branch-wrapped cone trees sparkles like a woodland fairytale. Twisted natural twigs, coiled into a conical shape, form the structure of each tree.
What makes them truly magical is the warm glow of fairy lights wrapped tightly around every inch. These trees shine without needing a single ornament.
They’re perfect for porches, garden corners, or even indoor fireplace displays. I love how the roughness of the twigs balances with the softness of the lights.
Materials Needed
- Bundles of flexible twigs or grapevine (6-8 ft per tree)
- Chicken wire or cone frame base (height varies: 2-4 ft)
- String lights (1-2 sets per tree)
- Wire cutters and garden gloves
- Twist ties or floral wire
Step-by-step Guide
Step 1: Shape your base using chicken wire into a cone, or use a pre-made form.
Step 2: Begin wrapping twigs around the base, starting from the bottom. Then secure as you go with floral wire.
Step 3: Wrap your string lights around the twig-covered cone. Next, tuck the battery pack or plug neatly at the back.
Step 4: Adjust branches for a more natural look and give it a gentle shake to remove loose bits.
Tips: If you’re using fairy lights, try a timer setting so they sparkle automatically each evening.
#2. Painted Wooden Pallet Trees in Trio
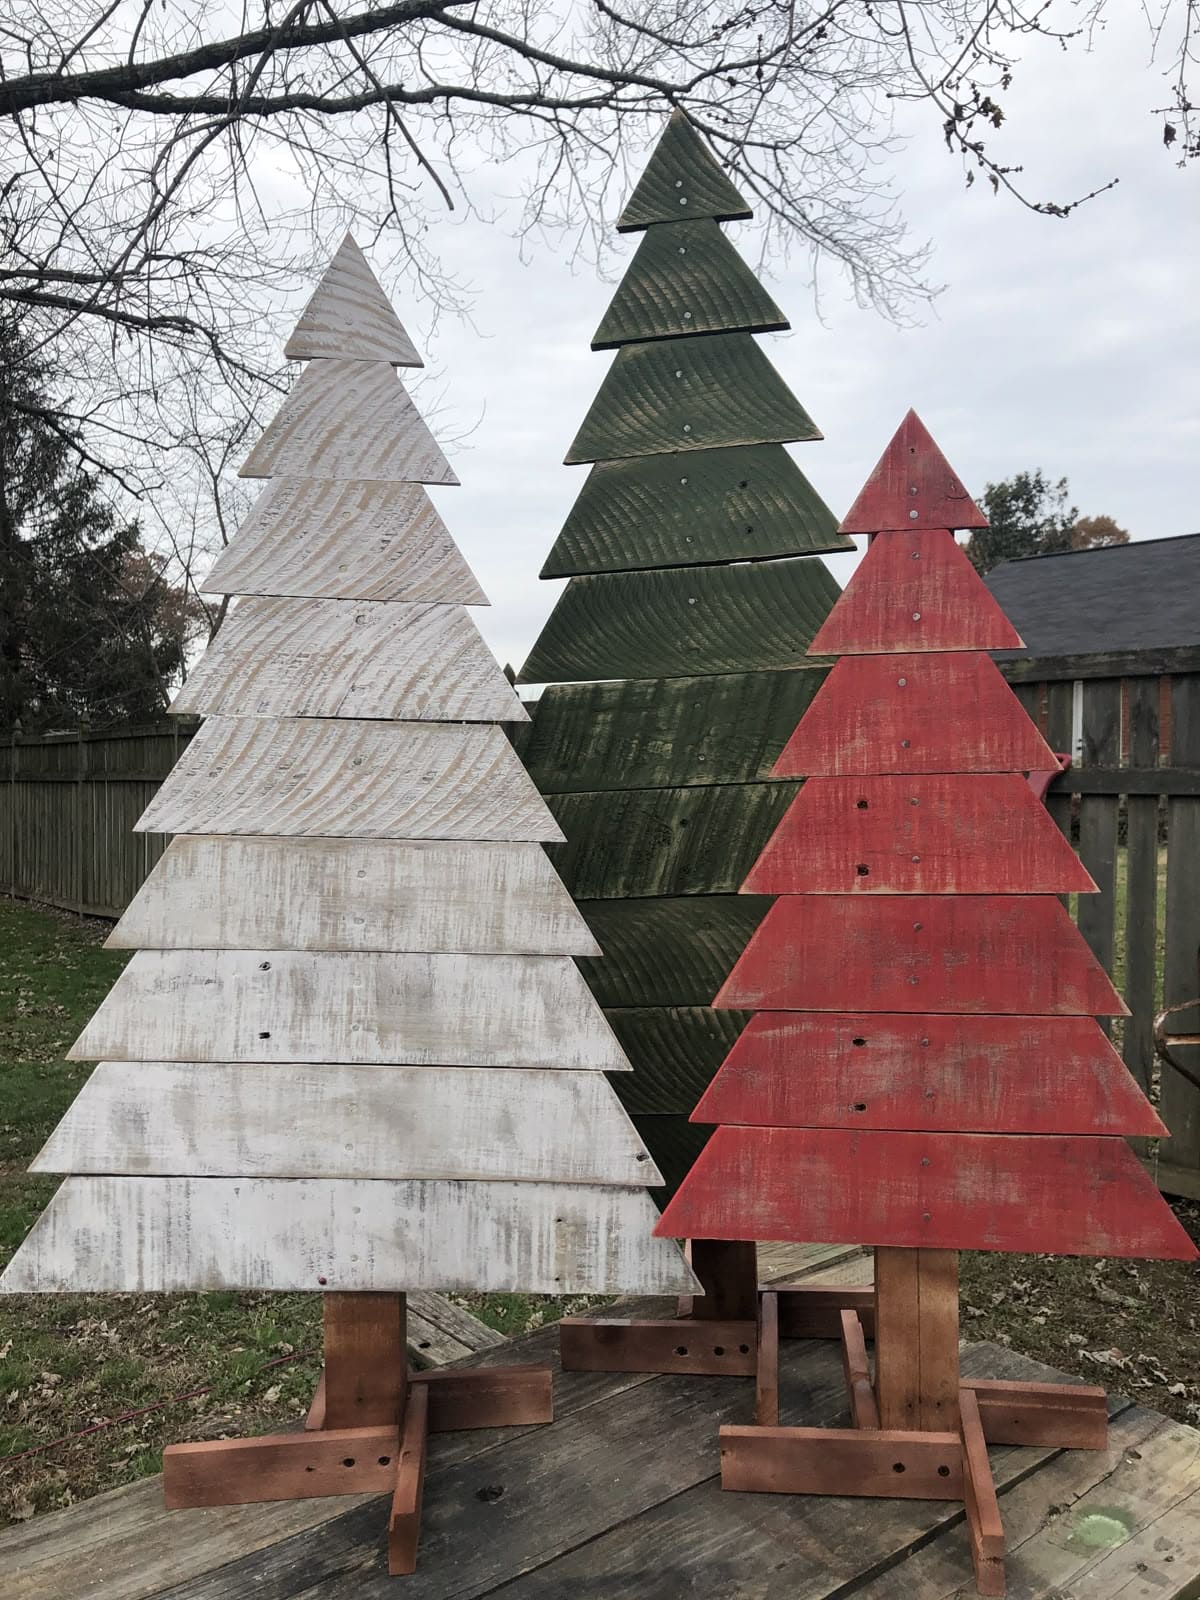
Classic charm meets rustic spirit in this festive trio of wooden pallet trees. Each tree is crafted from planks arranged in perfect symmetry, mimicking the layered look of fir branches.
Plus, the palette including whitewashed snow, evergreen, and weathered red brings out the timeless colors of Christmas in a beautifully subdued way. Their sturdy bases make them ideal for your porch, yard, or even flanking a fireplace indoors.
The staggered heights add nice visual interest too, creating a scene that feels balanced and intentionally styled.
Materials Needed
- Wood planks (various lengths)
- Wood for base and tree trunk (approx. 1.5″ x 2.5″)
- Paint in red, green, white + brushes
- Screws, drill, sandpaper
- Optional: wood stain for base
Step-by-step Guide
Step 1: Cut wood planks into tiered triangle layers, largest at the bottom and smallest at the top.
Step 2: Paint each set in your desired color, then lightly sand edges for a worn effect.
Step 3: Screw the planks onto a vertical post, spacing evenly for a tree shape.
Step 4:Finally, build a crisscross base, secure it to the post, and stain for a finished look.
#3. Giant Gnome Topiary Duo

This festive pair of oversized gnomes might just steal the entire neighborhood’s spotlight.
By dressing up tall evergreens with long white fringe beards, big round noses, and bold red hats, you’ll turn ordinary shrubs into full-blown holiday characters.
This is such a simple but genius use of landscaping. Just accessorize what’s already growing! Perfect for front yards with tall cone-shaped trees or bushes.
Materials Needed
- 2 tall evergreen bushes or topiaries (approx. 6-8 ft)
- White plastic tablecloths or streamers
- 2 pink balloons or plastic balls
- Red fabric, ribbon, or tulle
- Tape, zip ties, or garden-safe twist ties
Step-by-step Guide
Step 1: Cut your white tablecloths or streamers into long beard strips. You can wrap and secure them around the base of each bush, letting them drape down like gnome beards.
Step 2: Inflate your pink balloon or attach a ball near the top of the beard area to form the gnome’s round nose.
Step 3: Wrap red fabric around the midsection for a belt, tying it snugly around the greenery.
Step 4: Top it off with a pouf of red tulle or fabric at the very tip to mimic the gnome’s classic pointy hat.
#4. Elegant Mesh Ribbon Light Tree

This one absolutely dazzles. Like something straight out of a holiday dreamscape, this spiral tree made with white mesh ribbon and twinkling fairy lights feels luxurious without being complicated. Its glowing loops cascade like a celestial ribbon dance, wrapping your yard in quiet winter magic.
If you’re craving elegance with a modern twist, this project will win your heart at first sparkle.
Moreover, this showstopper uses lightweight mesh and basic support materials, but the results are breathtaking.
Materials Needed
- 1 PVC pipe or metal rod (about 7 ft tall)
- 10-12 ft of 2-inch wide white mesh ribbon
- 200–300 LED fairy lights (warm white)
- Garden stakes
- Wire or zip ties
- Optional: star tree topper (lighted)
Step-by-step Guide
Step 1: Secure the pole vertically into the ground or a weighted base for stability.
Step 2: Starting at the base, wrap the mesh ribbon upward in a spiral, keeping each loop wide and airy.
Step 3: Once you’re satisfied with the shape, weave or wrap the string lights along the spiral, securing with zip ties or wire as needed.
Step 4: Add the star topper and plug in for that brilliant, snow-globe-worthy glow.
#5. Stacked Log Christmas Tree for a Rustic Porch Display
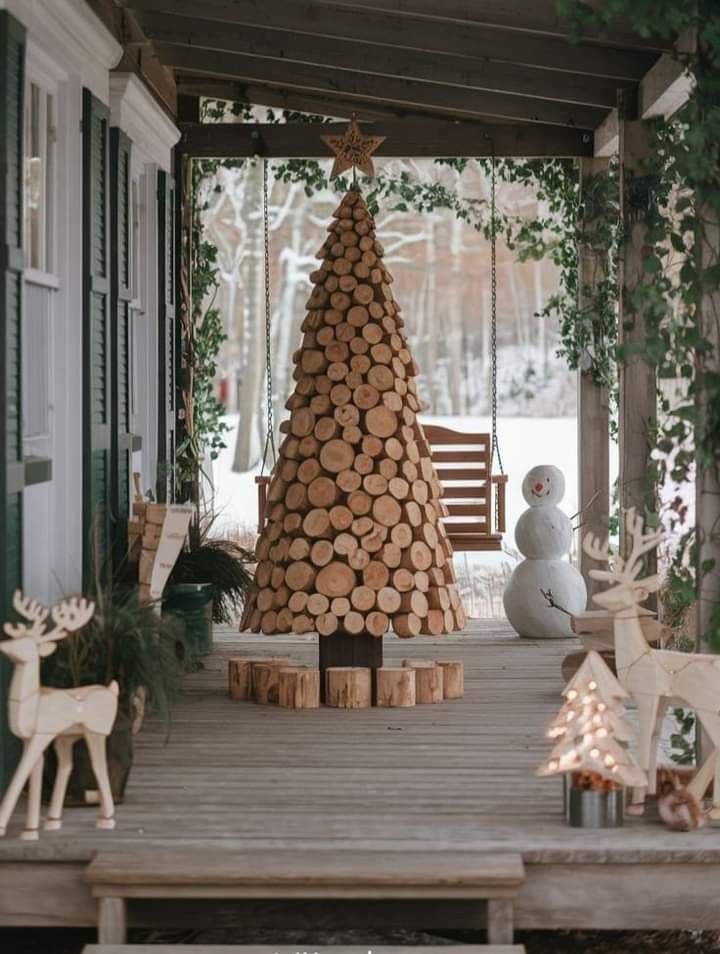
Made entirely of stacked wood slices, this design has serious charm and structure. It adds cozy warmth to any porch or entryway without needing a single strand of tinsel.
The different diameters create visual depth, and the natural grain of the wood adds organic texture.
This is the kind of tree that makes neighbors stop and stare in admiration. Perfect for cabins, country homes, or anyone craving a minimalist holiday vibe with a touch of craftsmanship.
Materials Needed
- 90-100 wood slices (approx. 3″-6″ diameter)
- Wooden dowel or central pole (6 ft tall)
- Wood glue and/or wood screws
- Drill with wood bit
- Sturdy wooden base
- Optional: clear varnish
Step-by-step Guide
Step 1: Prepare a central dowel or support pole. Secure it upright on a heavy wood base to prevent tipping.
Step 2: Begin stacking your wood slices from largest at the bottom to smallest at the top. Next, drill a center hole in each to slide them down the pole if desired.
Step 3: As you stack, rotate the slices slightly to create a natural, staggered look. Then add glue between layers for extra stability.
Step 4: Top it with a wooden star or small carved ornament. Seal the entire tree with varnish if you’ll display it outdoors.
#6. Rustic Glowing Stick Tree for the Yard
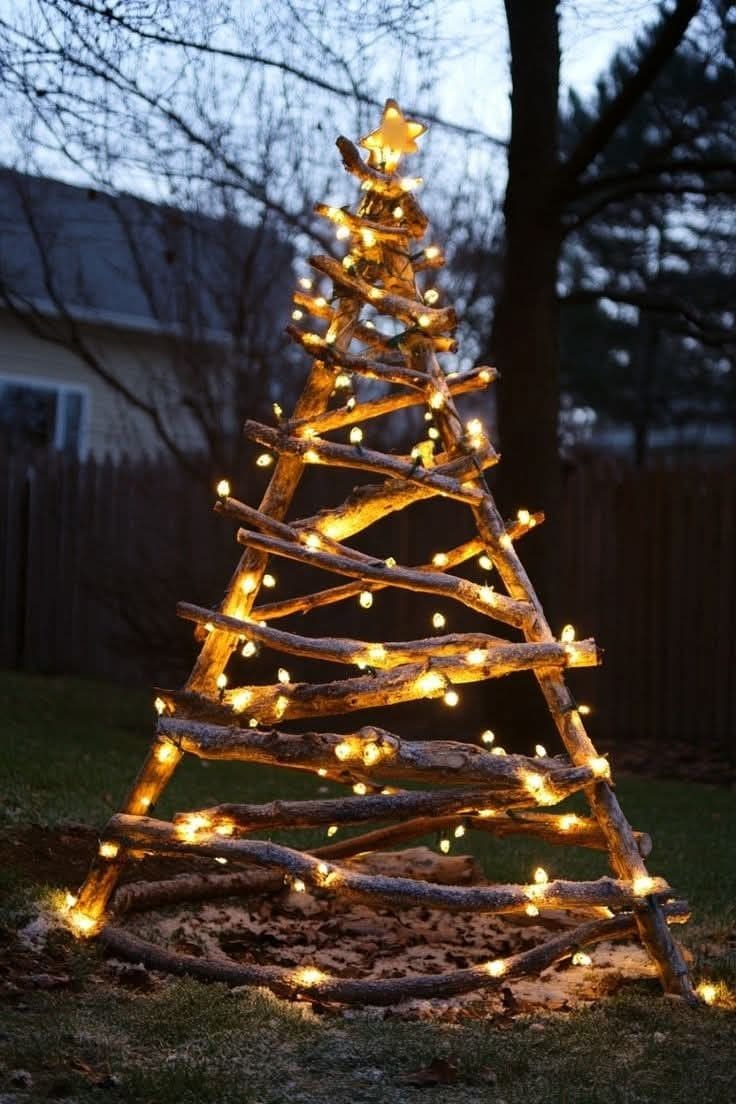
Wow, this tree glows with the kind of quiet charm only a handmade piece can offer. Built entirely out of weathered branches, it captures the essence of winter simplicity.
Twinkling lights dance along the uneven wood, casting warm shadows on the snow or grass beneath. It doesn’t try to be perfect, and that’s what makes it unforgettable.
You don’t need a workshop or fancy tools for this one. Just gather sticks on a chilly walk, stack them thoughtfully, and let the lights do the rest.
Materials Needed
- Tree branches or sticks (15-20 branches, 2 to 4 feet long)
- Twine or zip ties
- Warm white outdoor fairy lights (100-200 bulbs)
- Optional: star topper, faux snow spray
Step-by-step Guide
Step 1: Sort branches by length and lay them out in a rough triangular shape to visualize your tree.
Step 2: Start assembling from the bottom up. Then create a triangle frame using the longest branches, then layer shorter ones in zigzag patterns as you move upward.
Step 3: Secure joints using twine or zip ties. You make sure it’s stable before decorating.
Step 4: Wrap the entire tree with string lights, weaving between branches and layering for dimension.
Step 5: Add a simple star topper or a dusting of faux snow for a wintery touch.
#7. Painted Pallet Christmas Tree Stakes
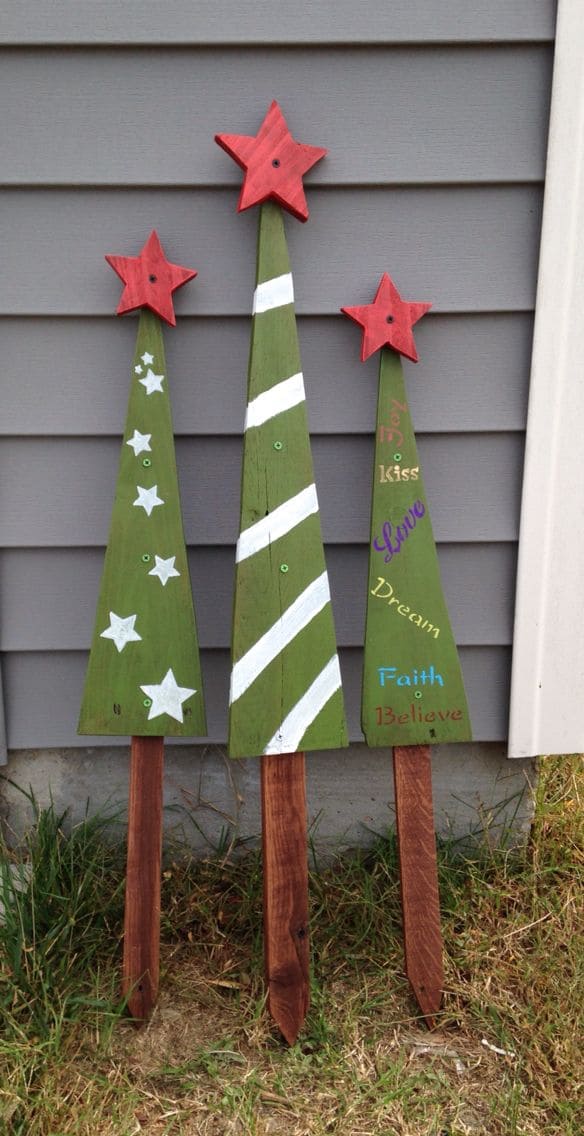
This trio of painted pallet trees turns plain scrap wood into a charming festive display. Each tree is cut into a simple triangular shape, painted with cheerful green tones, and topped with a bright red star.
You’ll notice hand-painted details like stars, stripes, and uplifting holiday words like Faith, Dream, Love, Believe adding a personal, meaningful touch.
They’re rustic, bold, and impossible to miss against your garden bed or by the porch steps. This project feels homemade in the best way: warm, imperfect, and full of holiday soul.
Materials Needed
- Wooden pallet boards or fence pickets (3 pieces, 18-24” tall)
- Wooden stakes or garden stakes (3, about 18” long)
- Acrylic paints (green, red, white, assorted colors)
- Paintbrushes (fine and wide)
- Wood screws
- Power drill or hammer
Step-by-step Guide
Step 1: Cut your boards into triangle tree shapes. Then sand lightly for smoother painting.
Step 2: Paint each tree green and let it dry. You can decorate them with stars, stripes, or words or whatever brings you joy.
Step 3: Attach each triangle to a wooden stake using screws or nails. Then paint the stars red and fix them to the top.
Step 4: Press the stakes into your yard, lining them up like a festive forest.
#8. Glowing Frame Cone Trees with Pine Sprigs
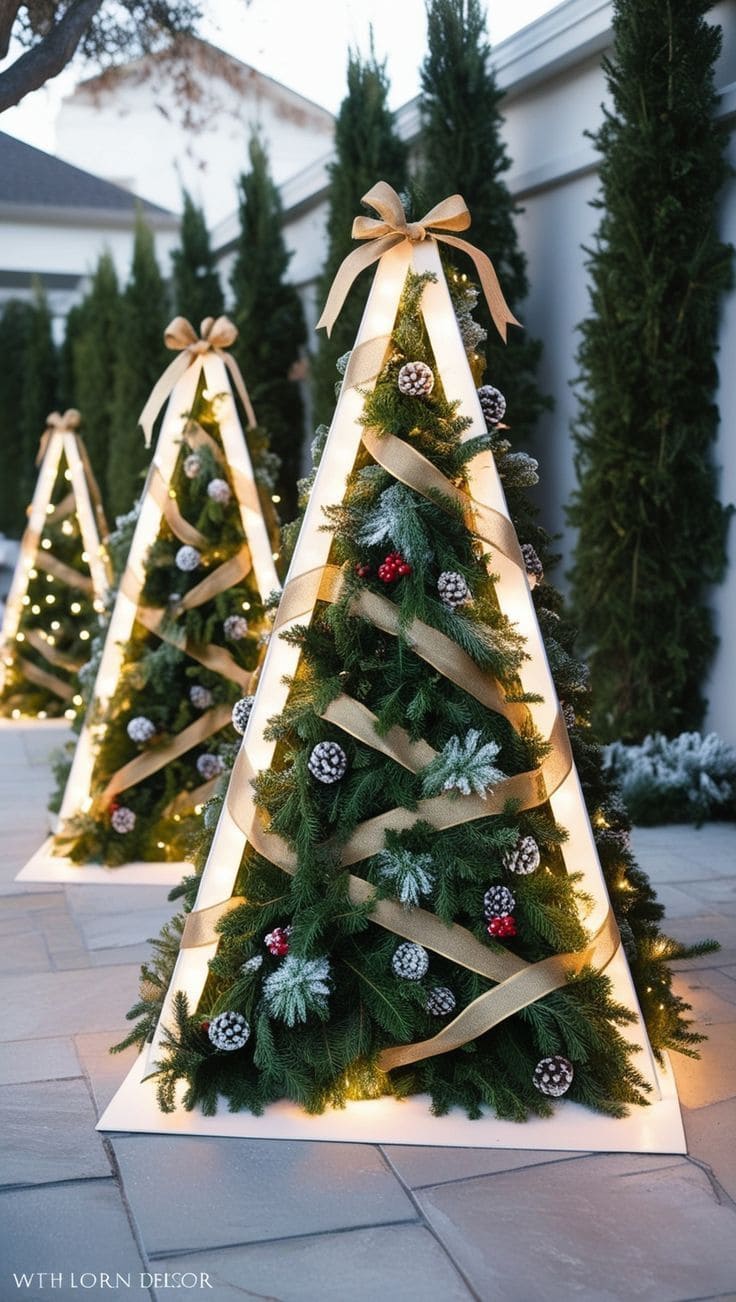
These luminous triangular trees are straight out of a winter dream. Their sleek, modern structure wraps around natural pine clippings, creating the perfect balance of festive tradition and architectural beauty.
Tucked into the corners of your patio or lining your garden path, they whisper elegance without a single snowflake needing to fall.
Plus, crisp white framing lit with soft LEDs paired with rich greenery and frosted pinecones. These trees glow softly like lanterns in the dusk, guiding your guests with holiday warmth and a touch of enchantment.
Materials Needed
- 4 wood boards (1″ x 4″ x 5 ft)
- Hinges or screws
- Outdoor LED strip lights or warm white light string (1 per frame)
- Fresh or faux evergreen branches
- 20-30 flocked pinecones and artificial berries
- Wide gold ribbon (2″ x 6 ft)
- Staple gun
Step-by-step Guide
Step 1: Construct triangular frames using wood boards. You then secure corners with screws or brackets, forming a tall pyramid shape.
Step 2: Attach LED strip lights or string lights along the inner edge of the frame. Next, tape or staple them down carefully.
Step 3: Layer greenery inside the triangle, starting at the bottom and overlapping upward to create fullness.
Step 4: Tuck pinecones, faux snow-dusted leaves, and berries between the branches for texture and contrast.
Step 5: Drape gold ribbon in a spiral motion down the tree, anchoring with staples or floral wire as needed.
Step 6: Top it off with a ribbon bow or elegant tree topper if you’d like an extra flourish.
#9. Upcycled Fork Tree for the Front Lawn
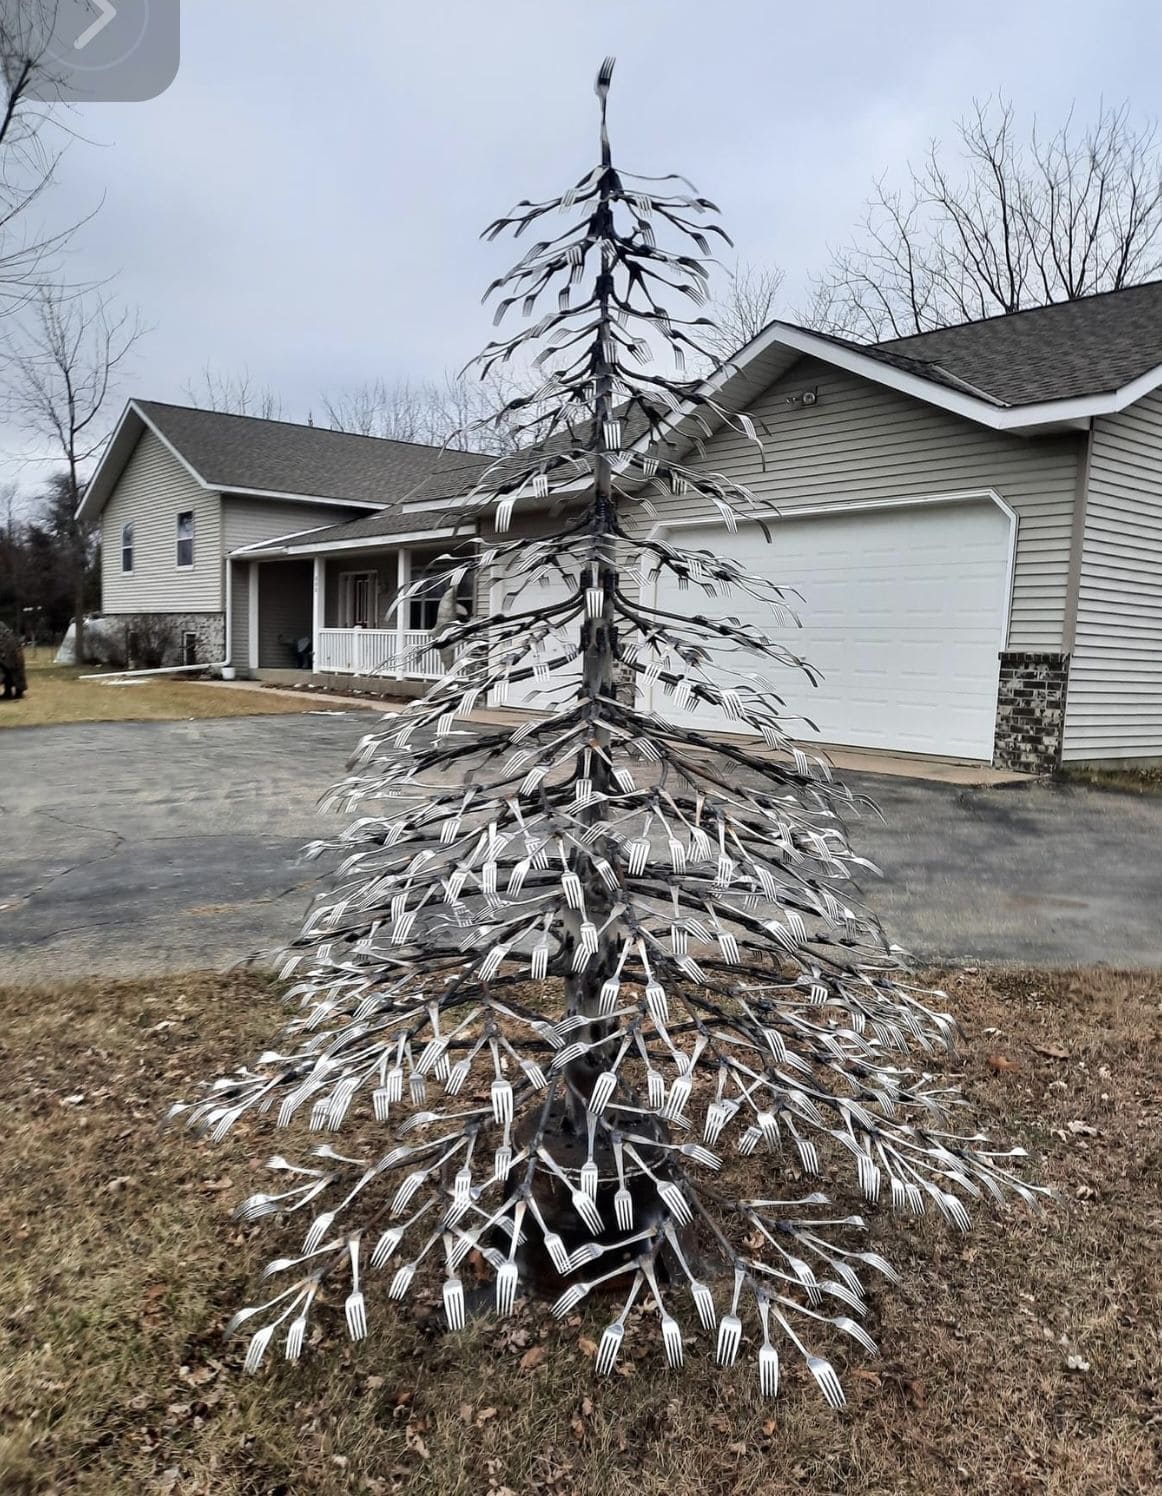
Imagine driving past this and doing a double take, yes, that’s a full-sized Christmas tree made entirely out of forks! It’s bizarre. It’s brilliant. It’s oddly elegant.
Crafted from a welded metal frame with dozens of bent forks wired or bolted on to resemble evergreen boughs, this is the kind of installation that gets people talking.
If you love turning trash into treasure or just enjoy playful absurdity, this fork tree belongs in your yard.
Materials Needed
- Metal pole (1, around 6-7 ft tall)
- 20-30 metal rods or rebar
- 150-200 recycled metal forks
- Drill with metal bit or welding tools
- Heavy-duty gloves and safety gear
- Optional: spray paint or weatherproof finish
Step-by-step Guide
Step 1: Weld or bolt metal rods onto the central pole in a tiered tree shape. Then space them evenly around for balance.
Step 2: Using screws or welding, attach forks facing outward along each branch. Let the tines curve downward to mimic pine needles.
Step 3: Secure the entire piece into the ground using a sturdy base. You should consider anchoring for windy weather.
Step 4: Optionally, spray paint the frame or forks for contrast like silver, black, or even red-and-green metallics.
#10. Towering Pine Cone Christmas Tree
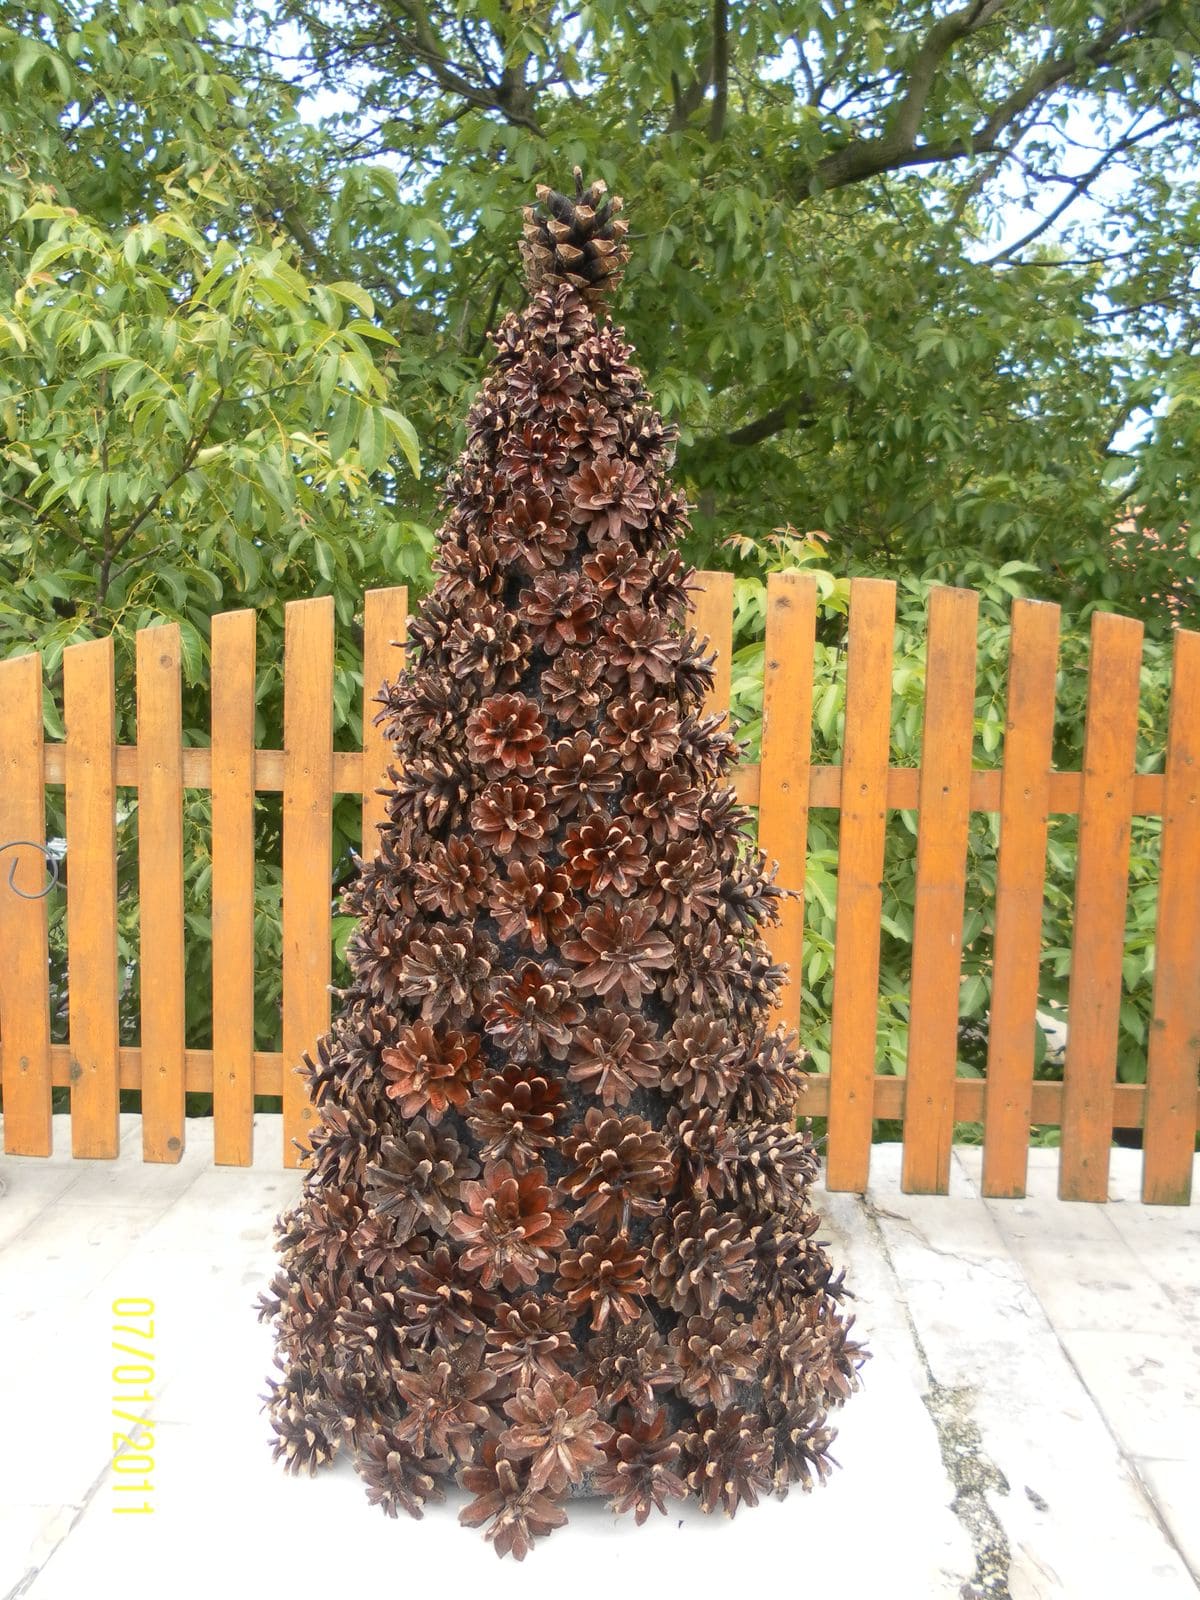
Wow, this tall pine cone tree is an earthy and enchanting take on holiday decor. With its conical shape and lush texture, it mimics a classic evergreen using only natural elements.
The layered placement gives it fullness and elegance, while the large pine cone topper adds a whimsical finishing touch. It’s a celebration of texture, simplicity, and the quiet beauty of nature.
Materials Needed
- 150-300 large pine cones
- Cardboard or wire cone base (3-4 feet tall)
- Hot glue gun + extra glue sticks
- Brown or black spray paint
- Protective gloves (optional)
Step-by-step Guide
Step 1: Spray your cone base a dark shade to prevent gaps from standing out. Let dry completely.
Step 2: Starting from the bottom, glue pine cones all the way around the base. Then work upward in overlapping layers for a full effect.
Step 3: Continue attaching cones until you reach the top, then crown it with a cluster of upright cones for a tree-like peak.
Step 4: Gently shake or brush away any loose debris. Optional, you lightly dust with faux snow or glitter for a frosted finish.
See more: 28 Unique Recycled Christmas Wreath Ideas to Elevate Your Holiday Decor
#11. Stacked Tire Christmas Tree
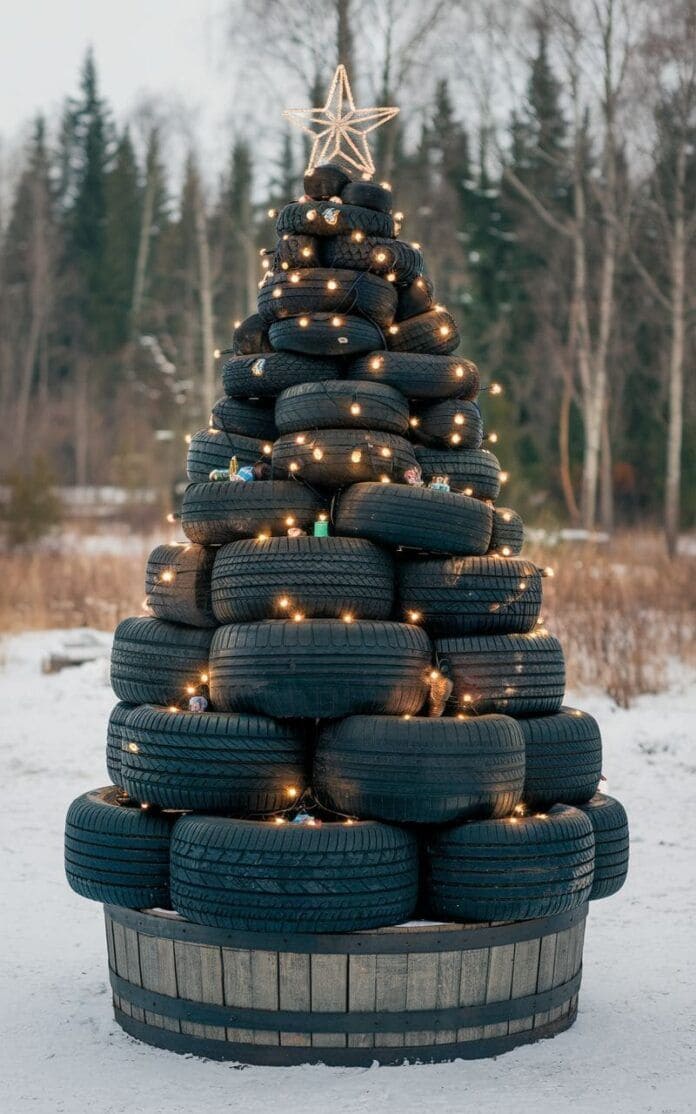
Who knew a pile of old tires could bring this much holiday cheer? This rugged, upcycled Christmas tree has serious industrial charm, perfect for a driveway, barn, or snowy open field.
It makes a statement without pretending to be dainty. Add some twinkle lights and a glowing star, and suddenly your scrap tires become the centerpiece of a quirky winter wonderland.
If you’ve got a stash of used tires and a bold spirit, this project turns garage leftovers into outdoor art.
Materials Needed
- 25-30 used car tires (varying sizes, 13″-22″ diameter)
- 3-4 strands of warm white outdoor string lights (100-count)
- 1 oversized LED star topper (14″-16″)
- Optional: wood barrel base or wood pallets
- Decorative gnomes, pinecones, or ornaments
- Extension cord and outdoor power source
Step-by-step Guide
Step 1: Sort your tires by size, from largest to smallest. Start stacking the largest ones at the base, gradually working upward to form a cone-like shape.
Step 2: Place your tire stack on a wooden platform or inside a decorative barrel if you want more height and structure.
Step 3: Wrap string lights around the tower, weaving through each tire layer to distribute light evenly.
Step 4: Nestle ornaments, gnomes, or little holiday figurines into the tire gaps for playful charm.
Step 5: Attach the star topper at the peak, using bungee cords or a weighted stand if needed.
#12. Whimsical Wooden Slat Tree with Bold Color
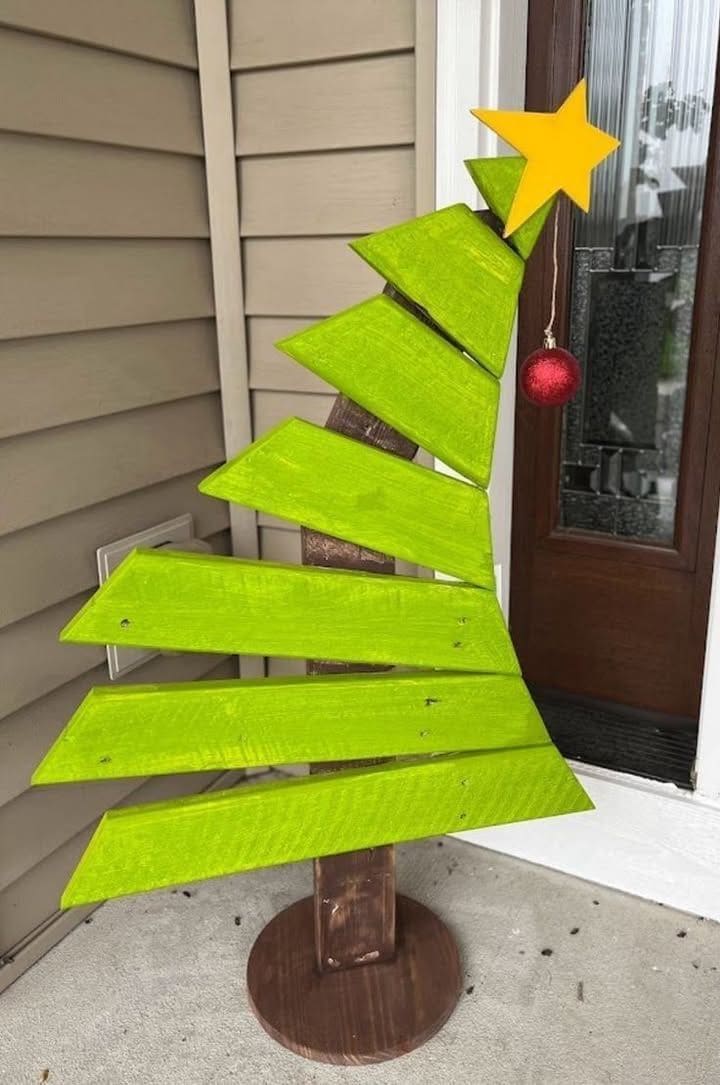
Playful, modern, and impossible to miss, this wooden slat Christmas tree brings cheer with a twist.
Instead of traditional symmetry, the diagonal design gives it a quirky, Dr. Seuss-like charm. Each bright green plank juts out in a jaunty angle, stacked like a puzzle on a sturdy wooden base.
Bonus, a golden star tips the top while a lone red ornament dangles off one side, making the whole piece feel animated, almost like it’s caught mid-sway in the wind. It’s a great fit for porches, patios, or anywhere that could use a bold, happy holiday punch.
Materials Needed
- 6-7 wood slats (various lengths)
- 1 wooden post (3-4 ft tall)
- Wooden base round (12-14 inches wide)
- Green and brown acrylic paint
- Yellow star cutout and 1 red ornament
- Screws, drill, and sanding block
Step-by-step Guide
Step 1: Sand and paint each slat in vibrant green; let dry completely.
Step 2: Paint the post and base brown, then screw them together for a stable support.
Step 3: Attach each slat at a slanted angle, starting from the bottom up, leaving space between each.
Step 4: Top with the wooden star and hang the ornament on the top edge for a whimsical touch.
#13. Whimsical Evergreen Gnome Planters
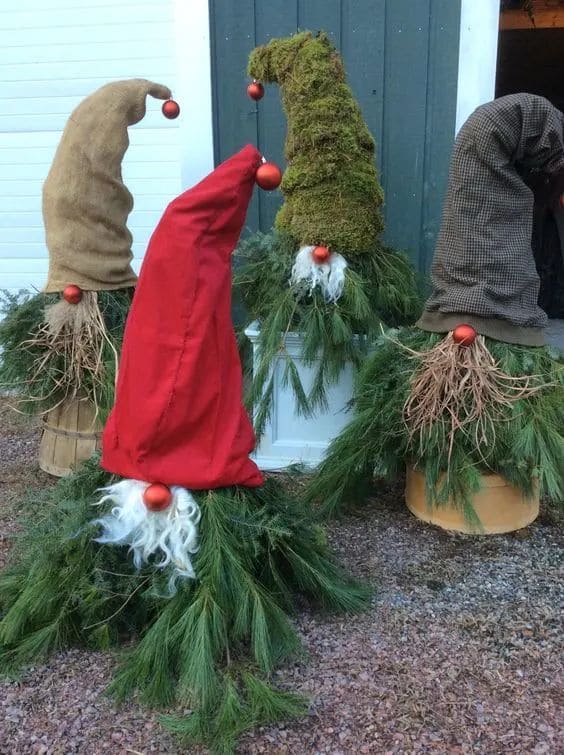
If you love a quirky holiday moment, these evergreen gnome planters are pure delight. Each one has its own personality and they all wear that signature bulbous nose with pride.
Specially, the beards made of pine boughs or straw spill out playfully from beneath their hats, making them perfect greeters by your porch or garage door.
They feel like woodland guardians dropped in from a storybook, charming, rustic, and full of mischief.
Materials Needed
- 4 large buckets or planters
- Fresh pine branches or evergreen clippings
- Fabric scraps, moss, burlap, or old clothes for hats
- Stuffing material (plastic bags, newspaper)
- 4 Christmas ornaments
- Hot glue gun or wire
Step-by-step Guide
Step 1: Fill each planter with sand or gravel for stability. Stick pine clippings in the center to create a full base, this becomes the gnome’s beard.
Step 2: Shape each hat using fabric or moss, stuffing them loosely and bending the tops for that floppy look. Secure with twine or glue.
Step 3: Attach an ornament where the hat meets the branches. it’s the signature nose. Then tuck in some faux beard accents (like curly straw or white yarn) if you want extra character.
#14. Glowing Wooden Tree Forest

This magical grove of wooden Christmas trees instantly transforms your yard into a winter wonderland.
Painted in crisp white and illuminated with warm string lights, these handcrafted trees look like they stepped out of a holiday postcard.
Their geometric branches and varied heights add depth and charm, glowing softly as dusk settles in. It’s elegant, calm, and full of peaceful spirit.
Materials Needed
- Wood planks or plywood sheets (¼” to ½” thick)
- White outdoor paint
- Outdoor string lights (warm white preferred)
- Wood glue or screws and drill
- 5-6 gold star toppers
- Sandpaper and optional clear sealant
Step-by-step Guide
Step 1: Cut the wood into triangular tree shapes of various sizes and create layered branch pieces with smaller triangles or angled boards.
Step 2: Paint all surfaces white and let them dry thoroughly. Then sand rough edges for a clean finish.
Step 3: Assemble each tree by stacking and securing branch layers using wood glue or screws from the back.
Step 4: Wrap each tree with string lights, hiding wires at the back. You can add a star topper for that perfect finishing touch.
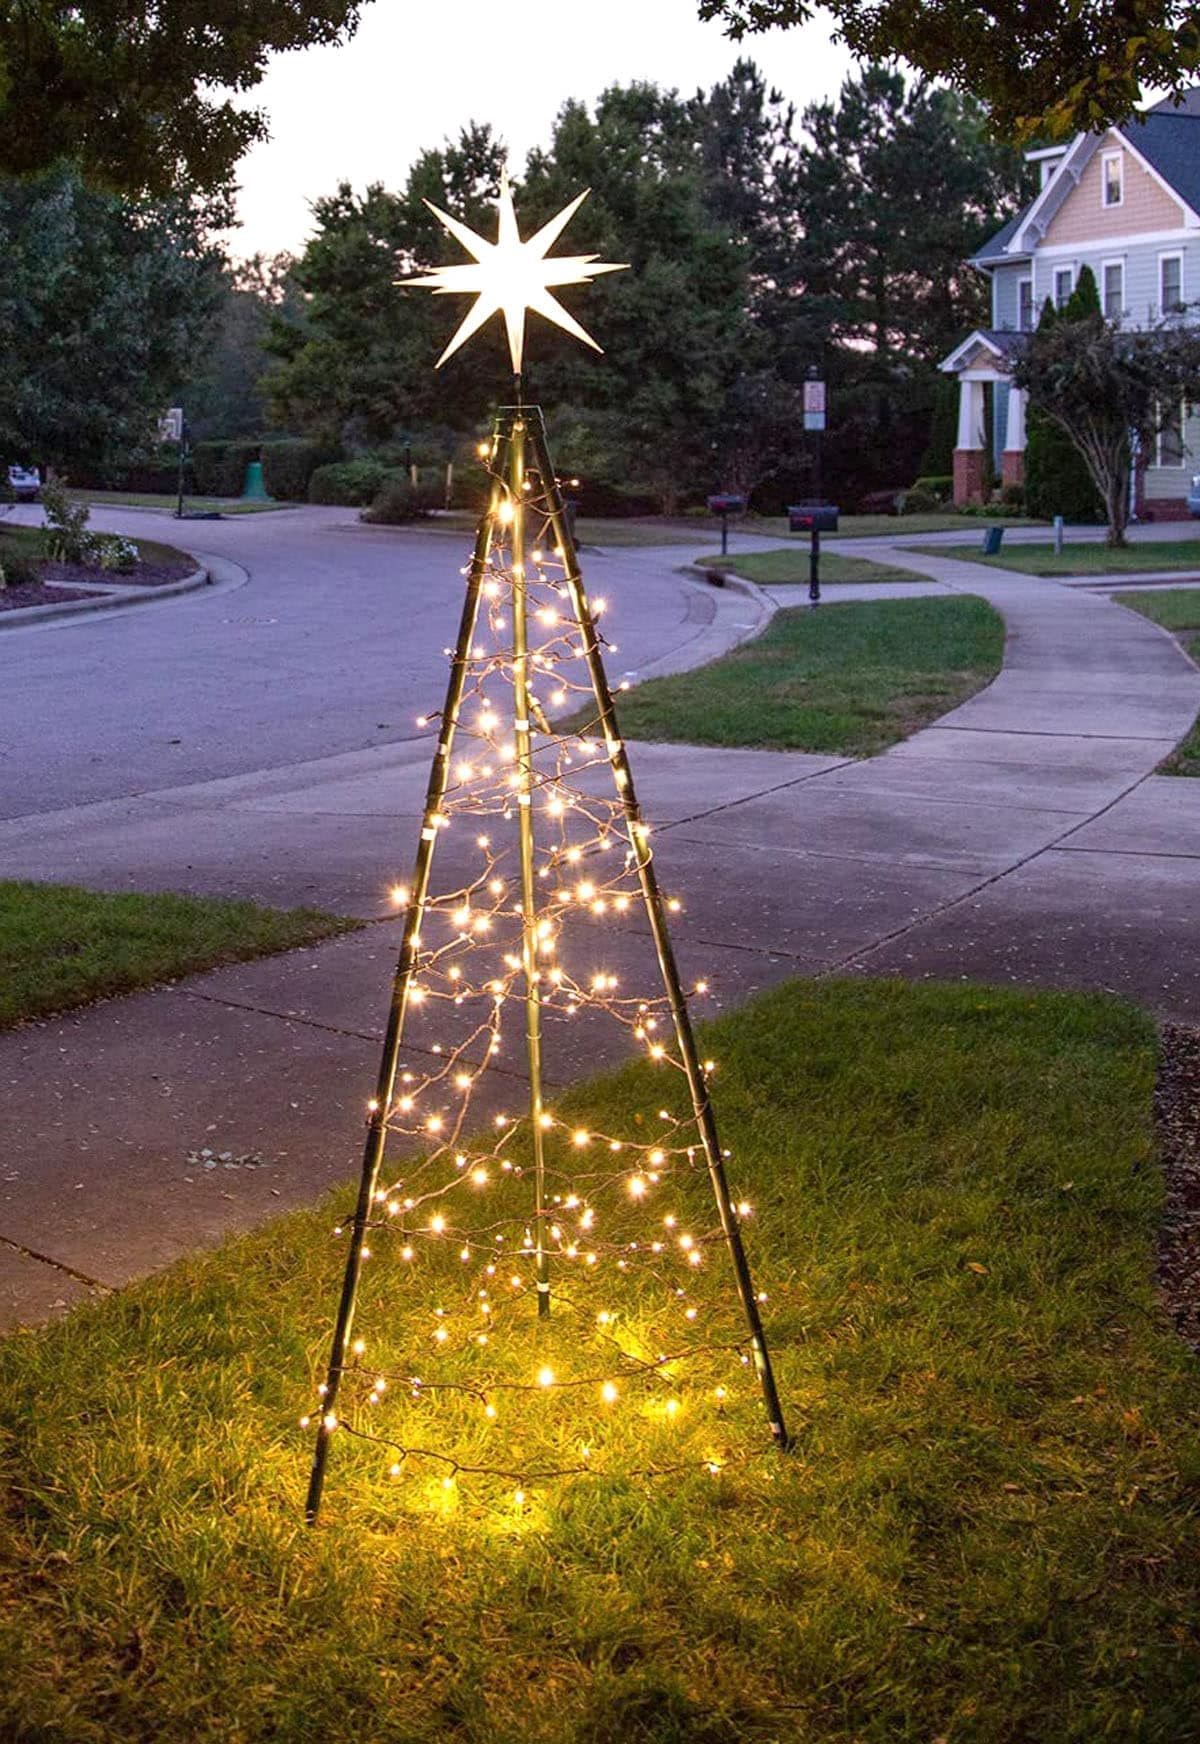
#15. Glowing Spiral Tree of Lights
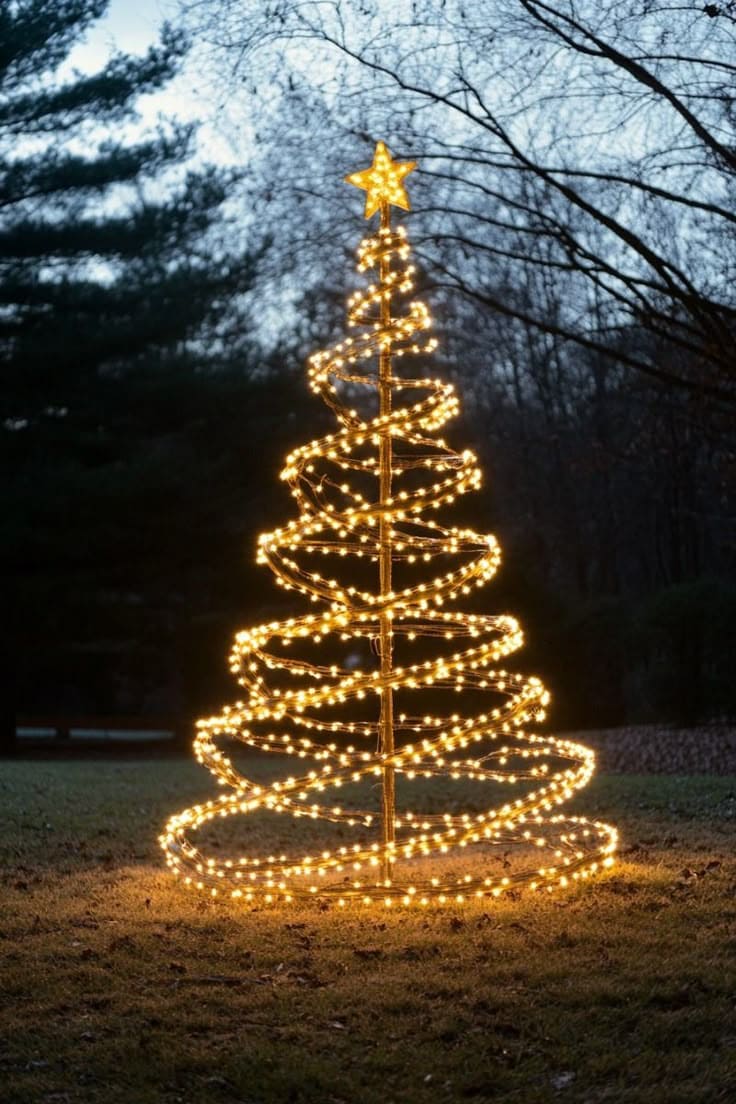
Interestingly, this glowing spiral tree looks like it was drawn by magic in the night air. The way the lights dance upward in soft, glowing loops is almost hypnotic like watching starlight take shape.
It’s a modern take on a classic Christmas tree, and yet it doesn’t lose any of the magic. If you’re dreaming of something bold but minimal, this one’s calling your name.
With just a metal rod and some carefully wrapped lights, you’ll turn your yard into a glowing winter wonderland that guests and neighbors won’t forget.
Materials Needed
- 1 metal or PVC pole (6-8 feet tall)
- Flexible garden wire or sturdy twine (at least 30 ft)
- 200-300 warm white LED string lights
- Ground stake or base
- Optional: star tree topper
Step-by-step Guide
Step 1: Install your center pole into the ground or secure it in a weighted base to keep it upright.
Step 2: Attach the end of the garden wire to the base, then spiral it upward around the pole, widening the circles as you go.
Step 3: Once the wire spiral is formed, wrap your string lights along the wire path from bottom to top.
Step 4: Plug in the lights and adjust the spiral for symmetry. Then finish with a glowing star if desired.
#16. Winter Silhouette Wonderland
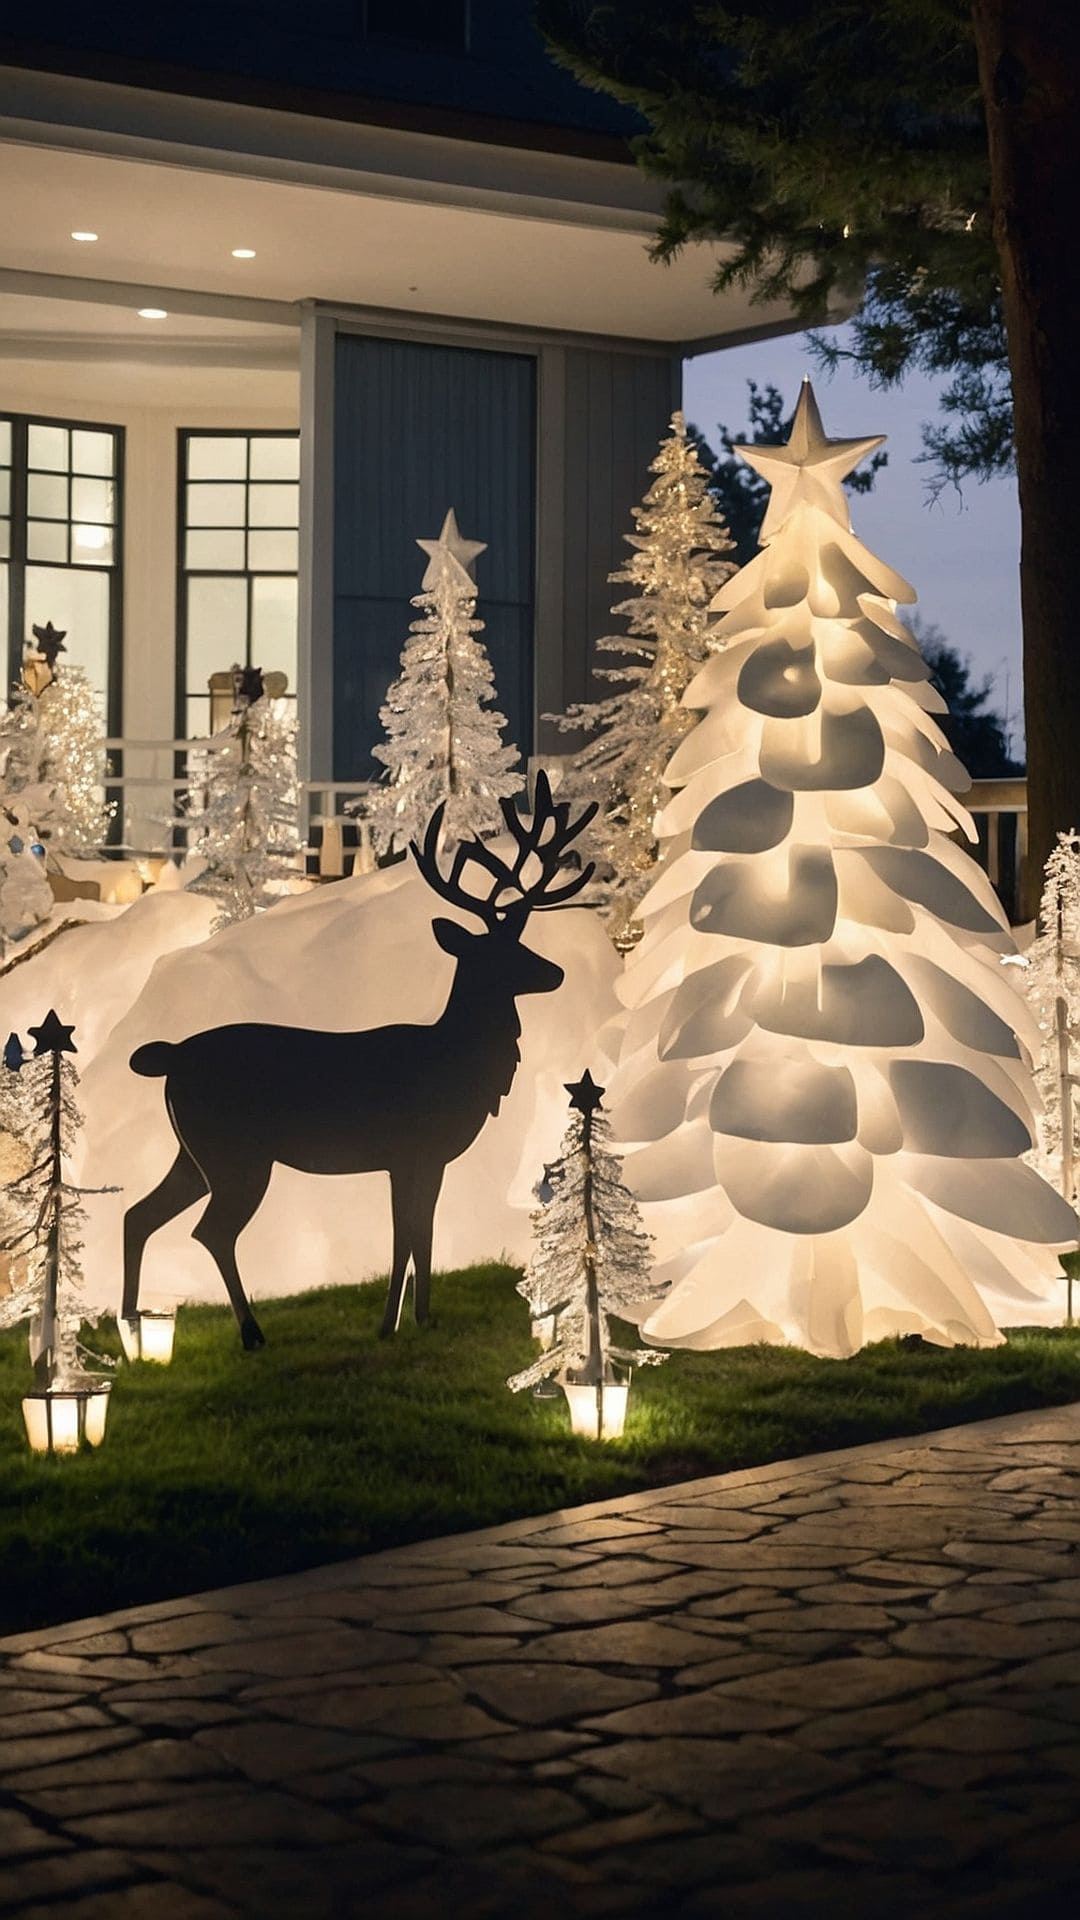
This display feels like a frozen dream whispered to life. A majestic white tree with soft, sculptural layers radiates warmth against the evening sky, while shimmering mini trees and lighted lanterns create depth and texture.
Plus, the flat black silhouette of a reindeer adds contrast and a hint of Nordic charm. This scene doesn’t scream Christmas, it glows with quiet elegance.
Materials Needed
- 1 large sculptural white LED tree (about 6 ft)
- 2-4 small acrylic or faux-glass light-up trees (3-4 ft)
- 1 black reindeer silhouette (4 ft tall, wood or metal)
- 4-6 LED pathway lanterns
- White backdrop fabric or foam
Step-by-step Guide
Step 1: Place your largest glowing tree slightly off-center for a natural, balanced layout.
Step 2: Position mini trees and lanterns around the scene in uneven clusters for organic flow.
Step 3: Install the reindeer silhouette in front of a lighted backdrop to highlight contrast.
#17. Tomato Cage Christmas Tree with Lights
To be honest, I used my old tomato cage as the frame then created a sparkling silhouette looking stunning on your lawn or by the sidewalk.
It’s lightweight, budget-friendly, and takes very little effort to make but the results feel surprisingly elegant once night falls.
The star topper adds height and shine, catching the eye from down the block. It’s a charming way to bring cheer to an otherwise quiet corner of your yard or driveway.
Materials Needed
- 1 large tomato cage (approx. 4 ft tall)
- 1 set of 100-150 warm white string lights
- 1 plastic or metal star tree topper (12-16 inches wide)
- Zip ties or twist ties
- Outdoor extension cord
Step-by-step Guide
Step 1: Flip your tomato cage upside down so the base becomes the tree tip. You secure the prongs together with a zip tie.
Step 2: Wrap your string lights evenly around the cage, spacing them as you go. For fuller coverage, use a second strand.
Step 3: Attach the star topper securely to the top using ties or wire.
Step 4: Plug it in and admire the magical glow!
#18. Rustic Nativity Ladder Tree Display
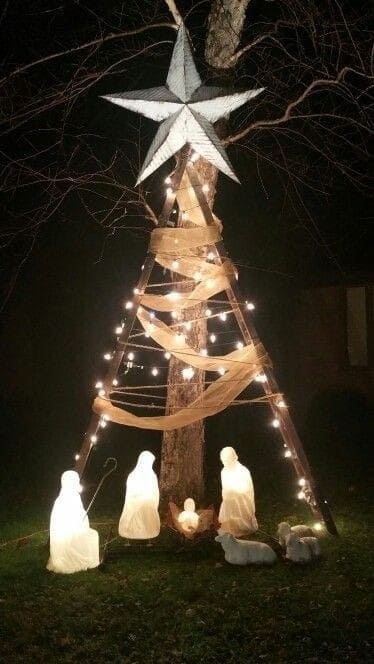
This outdoor setup tells the Christmas story in the most heartfelt way. It’s more than decoration, it’s a quiet moment of reverence right in your front yard.
Two wooden ladders lean together to form a simple triangle, drawing your eyes upward to the shining star. Twinkle lights, burlap ribbon, and a glowing nativity scene below pull it all together with warmth and meaning.
If you’re looking to honor the spiritual side of the season while keeping things handmade and organic, this is a stunning way to do it.
Materials Needed
- 2 tall wooden ladders (6–8 ft height)
- 10 ft burlap ribbon (6-8 inches wide)
- 100-150 warm white string lights
- Large star tree topper (paper, metal, or wood)
- Outdoor nativity figures (Mary, Joseph, Baby Jesus, animals)
- Zip ties or twine to secure lights and ribbon
Step-by-step Guide
Step 1: Position two ladders to form an A-frame in front of a tree trunk or stable background.
Step 2: Wrap burlap ribbon in a loose spiral between the ladders to mimic a Christmas tree shape.
Step 3: Drape the lights from rung to rung, weaving in between the ribbon.
Step 4: Place the nativity figurines at the base and top it all off with a large star above the frame.
Tips: Secure your ladders into the ground using garden stakes if wind is a concern. You can also paint or weatherproof the wood for longer outdoor durability.
Read more: 20 Beautiful Nativity Scene Wall Displays to Celebrate the True Spirit of Christmas
#19. Upcycled Soda Can Christmas Tree

Who said holiday cheer has to come with glitter and ornaments? This soda can Christmas tree is a brilliant statement piece that fuses color, creativity, and sustainability.
Each tier pops with familiar soda brands like Coke, Sprite, Fanta, and more creating a rainbow of refreshment that turns recycling into a showstopper.
It’s quirky, bold, and honestly a lot of fun to make with kids or your community. The layers of tinsel and garlands give it a sparkly finish, and the star topper brings it all together.
Materials Needed
- Approx. 200 empty soda cans (washed and dried)
- Metal or wood tiered stand (about 5-6 tiers)
- Silver and red tinsel garlands (10-15 ft each)
- Craft wire or hot glue
- Star tree topper (approx. 10-12 inches)
- Optional: cardboard base sign for messages
Step-by-step Guide
Step 1: Sort and stack your soda cans by size and color for each tier level.
Step 2: Attach cans to each ring of the stand using craft wire or glue, just secure enough so they stay put outdoors.
Step 3: Drape tinsel around each level to hide gaps and add shimmer.
Step 4: Finally, place your topper and display with pride!
#20. Wire Cage Lighted Christmas Trees
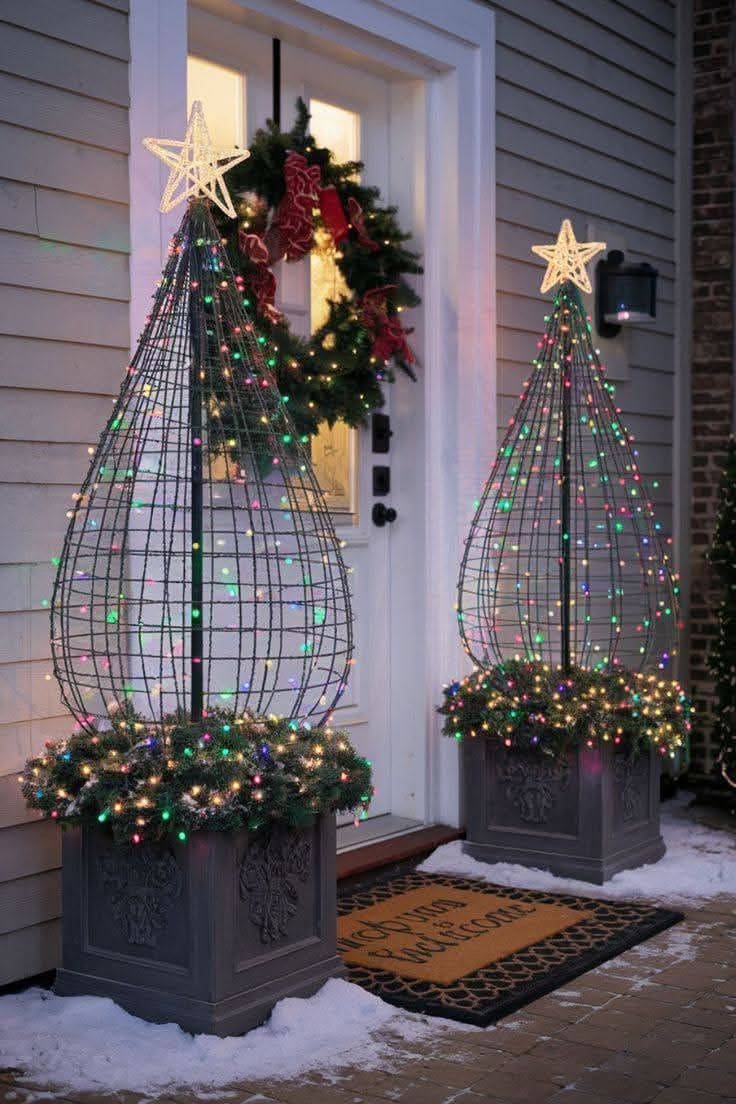
If you’re looking to create something magical and tall to flank your front door, these wire cage Christmas trees bring drama and sparkle.
The structure mimics the elegance of a teardrop evergreen, while the lights create a radiant halo in the winter dusk.
Set in classic planters with garland trim, they add both vertical height and cheerful symmetry to your holiday entrance.
Materials Needed
- 2 metal tomato cages (60” tall)
- 2 large outdoor planters (at least 16″ × 16″)
- 4-5 strands of multicolor LED string lights (100-count per tree)
- 2 large star toppers (12″ wide)
- Garland (2 packs of 9-ft faux pine garland)
- Zip ties or floral wire
- Heavy bricks or rocks
Step-by-step Guide
Step 1: Place bricks or rocks in the bottom of the planter to weigh it down. Insert the tomato cage, point up.
Step 2: Use zip ties to narrow and fasten the top of the cage, shaping it like a tree.
Step 3: Wrap your LED lights evenly from top to bottom, securing them as needed.
Step 4: Coil the garland around the base of the tree where it meets the planter for a lush look.
Step 5: Attach the star topper at the peak of the cage using floral wire.