Looking to give your front door a creepy makeover this Halloween? These DIY spooky wreath ideas are just what you need to send a shiver down your visitors’ spines before they even knock.
You don’t need fancy tools or professional skills, just a little imagination, some craft supplies, and a taste for the eerie.
From glowing eyes peeking out of grapevines to yarn-wrapped spiders and felt ghosts, these projects are easy to customize for your style and scare level. Dive in, pick your favorite, and let your door do the haunting this Halloween season.
#1. Coraline-Inspired Other Mother Wreath
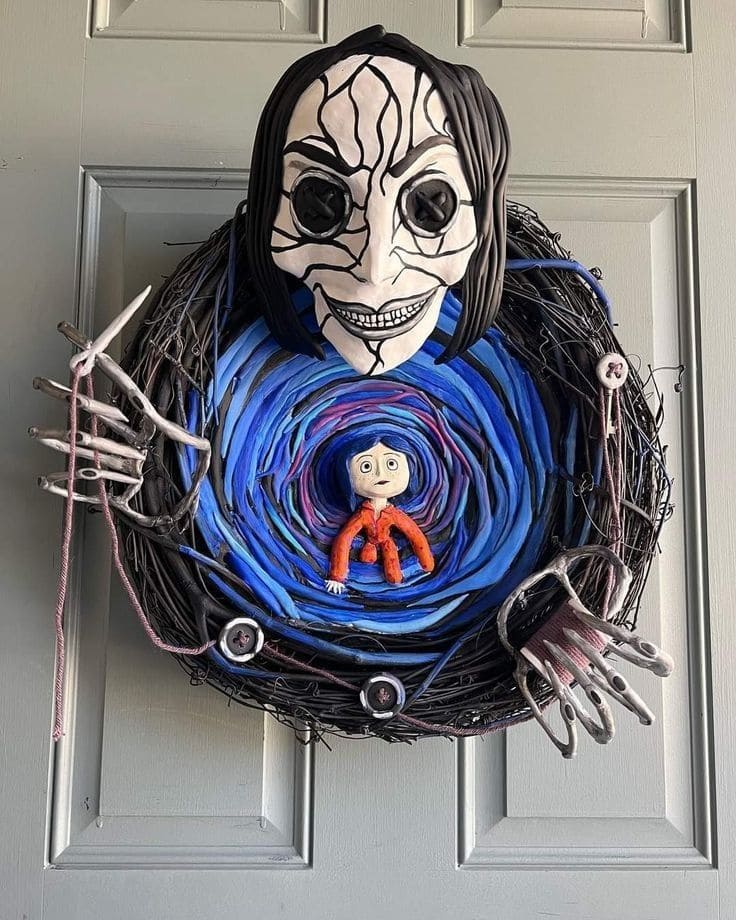
Unsettling and fascinating all at once, this Coraline-themed wreath turns your front door into a twisted fairytale portal.
At its core, the swirling blue tunnel pulls you into the Other World, where the stitched-up smile of the Other Mother looms above. Her elongated fingers and button eyes grip the edges like a puppet master.
In addition, every eerie detail from the button accents to Coraline’s vivid orange coat, adds a handcrafted, stop-motion charm that feels straight out of the movie.
Materials Needed
- Grapevine wreath form (16″ or larger)
- Polymer clay in shades of blue, black, and flesh tones
- Acrylic paints for fine details
- Buttons, wires, and felt for accents
- Hot glue gun
- Wire cutters and sculpting tools
Step-by-step Guide
Step 1: Start by forming a layered tunnel effect in the center using shaped and painted clay or layered felt in blue shades.
Step 2: Sculpt the Coraline and Other Mother figures using polymer clay, then bake or harden as needed and paint the fine details.
Step 3: Attach the clay figures and wire fingers securely to the wreath with hot glue or floral wire.
Step 4: Embellish with button details, painted veins, or stitched string to add character-specific creepiness.
#2. Colorful Yarn Ball Spider Wreath
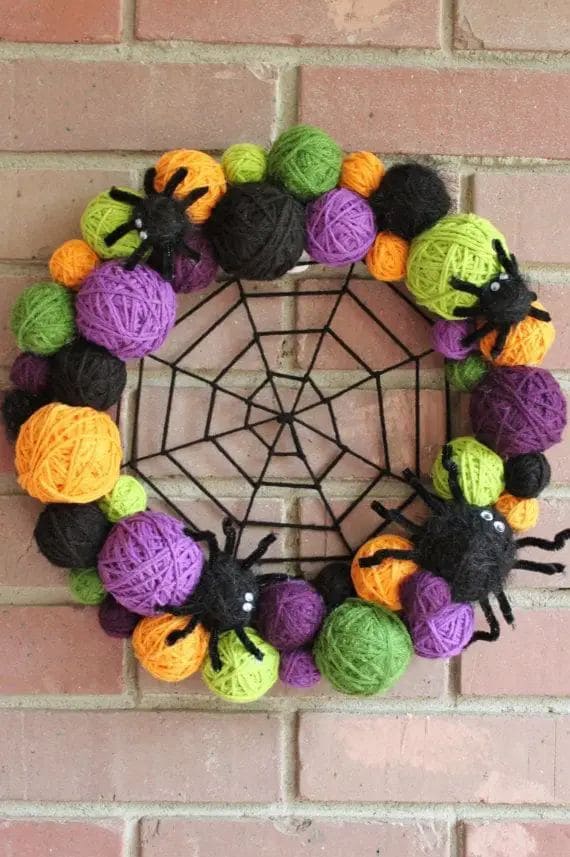
Playful yet spooky, this wreath wraps up Halloween fun with a crafty twist. Bright yarn balls in festive hues like pumpkin orange, lime green, wicked purple, and deep black, circle a bold spiderweb at the center.
Oversized yarn spiders creep around the edge, their googly eyes and fuzzy legs adding just the right mix of silly and eerie.
Plus, it’s a fantastic way to repurpose leftover yarn and bring crafty charm to your front door or fireplace mantle.
Materials Needed
- Foam or wire wreath base (12-14″)
- Yarn in orange, black, green, and purple
- Styrofoam balls (various sizes)
- Pipe cleaners (black)
- Googly eyes
- Hot glue gun and glue sticks
- Black yarn or string for web
Step-by-step Guide
Step 1: Wrap each foam ball tightly in yarn to create colorful spheres.
Step 2: Arrange and glue the yarn balls around the wreath base, mixing colors and sizes.
Step 3: Form spiders using black yarn-wrapped balls, pipe cleaner legs, and googly eyes, then glue them onto the wreath.
Step 4: Create a spiderweb in the center using black yarn crisscrossed and knotted securely.
#3. Bewitching Witch Hat Floral Wreath
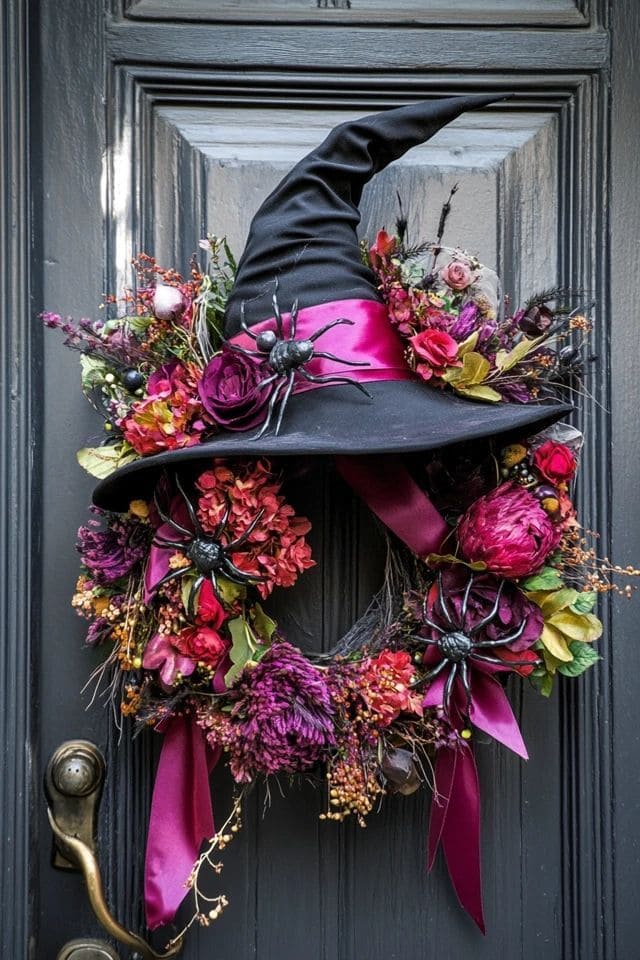
Moody, mysterious, and undeniably elegant, this Halloween wreath brings a touch of gothic glamour to your front door.
Draped with a tall, crooked witch hat and surrounded by a mix of deep magenta, burgundy, and plum-toned florals, it feels like something straight out of a haunted garden.
Bonus, velvet black spiders crawl playfully across the blooms, and matching satin ribbons cascade down with dramatic flair. It’s both enchanting and eerie, the perfect welcome for guests who love a dash of dark romance in their decor.
Materials Needed
- Black witch hat (1 large)
- Artificial flowers in burgundy, purple, and dark red (15-20 blooms)
- Large grapevine wreath (16-18″)
- 3-5 black plastic spiders
- Plum satin ribbon (1-2 yards)
- Hot glue gun and floral wire
Step-by-step Guide
Step 1: Attach the witch hat to the top of the grapevine wreath using floral wire or hot glue.
Step 2: Tuck artificial flowers around the wreath base, gluing securely for a full, layered look.
Step 3: Add plastic spiders onto the blooms and ribbon for a spooky twist.
Step 4: Finally, tie and attach flowing ribbons at the base for added elegance and movement.
#4. Skeleton Hand Pinecone Wreath
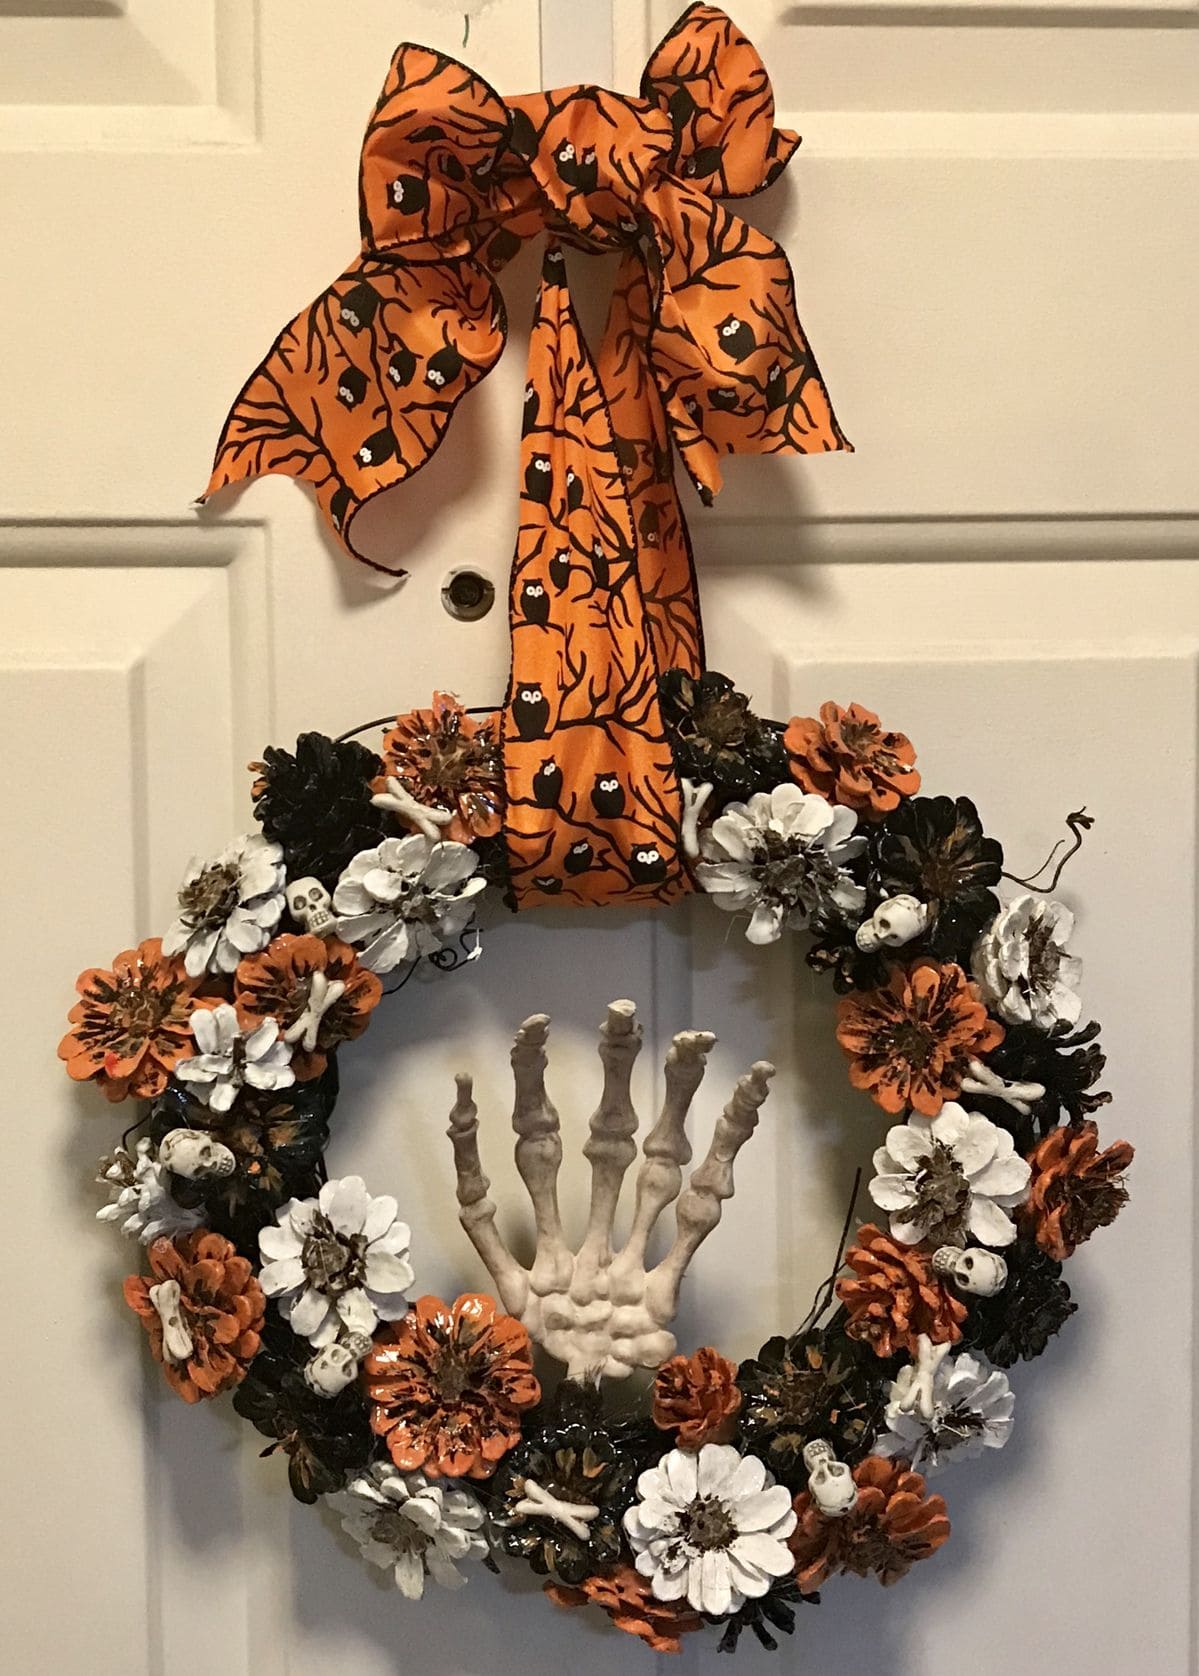
This wreath is a quirky twist on Halloween tradition, combining rustic pinecones with a bold skeletal centerpiece that feels like it’s creeping through your doorway.
Painted in sharp black, bright white, and rich orange, the pinecones mimic autumn blooms with just enough eerie charm. Tiny skulls and bones peek out between petals, while the giant hand in the center adds an unforgettable focal point.
That oversized Halloween ribbon up top ties it all together with a grin. Hang this on your door and you’ll get curious stares, amused chuckles, and probably a few compliments from trick-or-treaters.
Materials Needed
- 1 foam or grapevine wreath form (12-14″)
- 25–30 pinecones (cleaned and dried)
- Acrylic paint (orange, white, black)
- Plastic skeleton hand (approx. 8″)
- Mini skulls and bones (bag of 10-15)
- Halloween-themed ribbon (2″ wide, 1.5 yards)
- Hot glue gun and floral wire
Step-by-step Guide
Step 1: Paint the pinecones in three batches like white, orange, and black. Let them dry completely.
Step 2: Attach the pinecones around the wreath form using hot glue, spacing the colors for balance.
Step 3: Insert and glue in the skeleton hand at the center, slightly tilted for a natural reach effect.
Step 4: Tuck mini skulls and bones into the gaps between pinecones and glue securely.
Step 5: Create a bold ribbon bow and loop, then wire it to the top for easy hanging and you are done!
#5. Twilight Bat Swarm Wreath
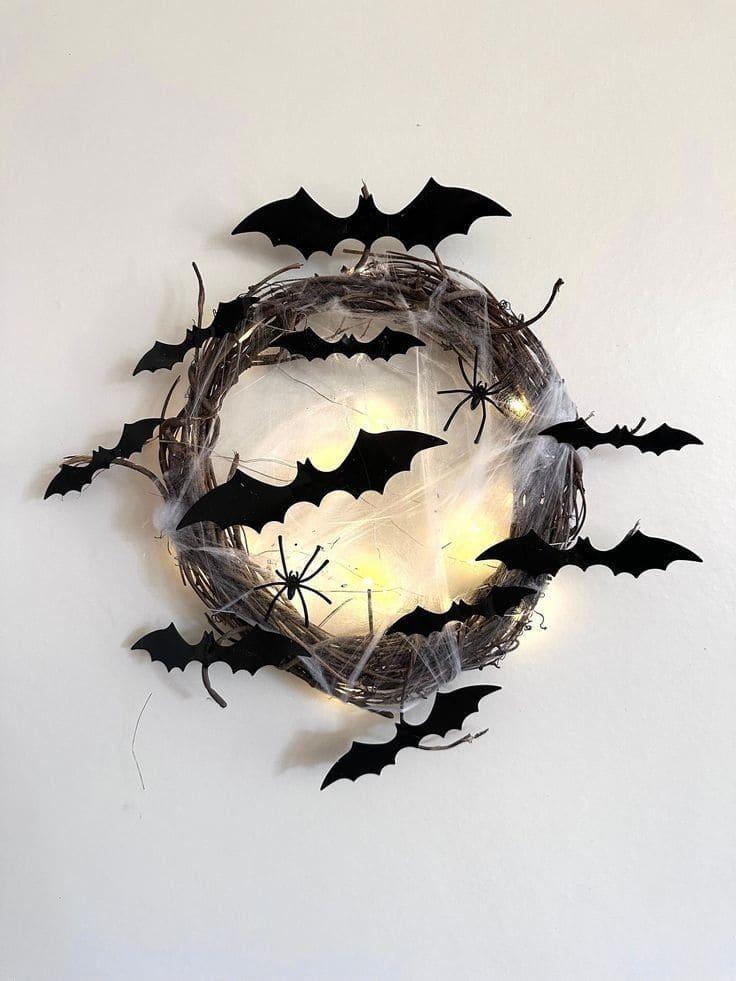
Simple yet striking, this grapevine wreath captures a moment straight out of a midnight flight.
Black paper bats appear to take off in every direction, as if disturbed from their roost. Tangles of faux cobweb and a few eerie spiders add just the right dose of creepy.
But it’s the subtle warm glow of fairy lights that gives the whole scene a cinematic edge.
Materials Needed
- Grapevine wreath base (12-14″)
- 12-15 black cardstock or pre-cut bat shapes
- 4-5 plastic spiders
- Spiderweb cotton or cheesecloth
- Battery-operated fairy lights (1 small strand)
- Glue dots or hot glue
Step-by-step Guide
Step 1: Weave the fairy lights throughout the grapevine base and tuck the battery pack behind.
Step 2: Stretch spiderweb cotton loosely across the front, letting it snag in the twigs.
Step 3: Attach bats around the edges with glue dots, arranging them in a flying pattern.
Step 4: Now, you add plastic spiders to the webbing and branches for an extra scare factor.
#6. Bewitched Door Wreath With Legs
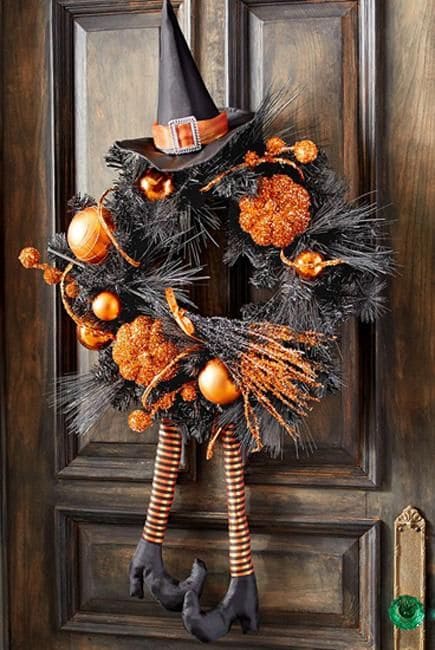
If you’ve ever wanted to make it look like a witch crash-landed on your front door mid-flight, this is your moment.
This black and orange wreath captures the whimsy of Halloween with glittery pumpkins, shiny ornaments, a pointy witch hat on top, and a hilarious pair of striped legs dangling below.
It’s not just decoration, it’s a little drama, a lot of sparkle, and the perfect pinch of playful mischief to welcome trick-or-treaters with a grin.
Materials Needed
- Black wreath form (16-18″ diameter)
- Artificial pine branches (approx. 10 pieces)
- 6-8 orange glitter pumpkins (3-5″ wide)
- Assorted orange and gold ornaments (12–15)
- Witch hat (approx. 10″ tall, lightweight)
- Striped witch legs with boots (15-18″ long)
- Orange glitter picks or stems
- Hot glue gun and floral wire
Step-by-step Guide
Step 1: Attach pine branches to the wreath form using floral wire to build a lush, spiky base.
Step 2: Tuck and glue glitter pumpkins and ornaments throughout, clustering for visual balance.
Step 3: Insert glittery orange picks and sprays for texture and sparkle. Then you secure the witch hat at the top with hot glue or wire.
Step 4: Attach the witch legs to the back of the wreath so they dangle below like she’s been flattened by Halloween fun.
#7. Haunted House Rag Wreath
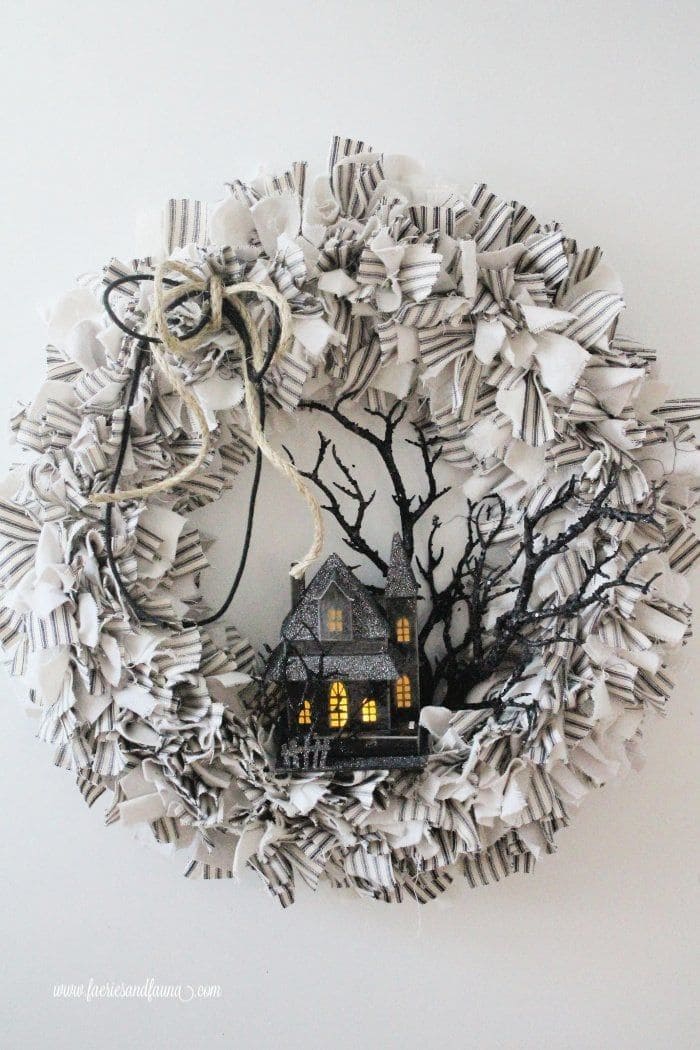
Tucked into the soft, frayed texture of cream and striped ribbons is a glowing haunted house, complete with bare black branches that reach out like skeletal fingers.
The subtle monochrome palette makes it feel elegant yet spooky, like a haunted cottage lit by candlelight on a foggy October night.
Plus, it’s an understated Halloween piece that still gives you chills.
Materials Needed
- Wire wreath form (14″)
- Neutral striped and solid fabric (about 2 yards total)
- Mini haunted house figurine with battery lights
- Black faux tree branches (2-3 small picks)
- Twine or thin rope
- Hot glue gun and glue sticks
Step-by-step Guide
Step 1: Cut fabric into strips around 1″ x 8″ and tie them tightly around the entire wire form until full and fluffy.
Step 2: Secure the haunted house at the base using hot glue or wire, facing slightly forward.
Step 3: Insert and glue the black branches behind the house, fanning them upward for dramatic effect.
Step 4: Finally, loop some twine at the top for hanging and adjust the rag strips to frame the scene.
#8. The Witch Is In Cauldron Wreath
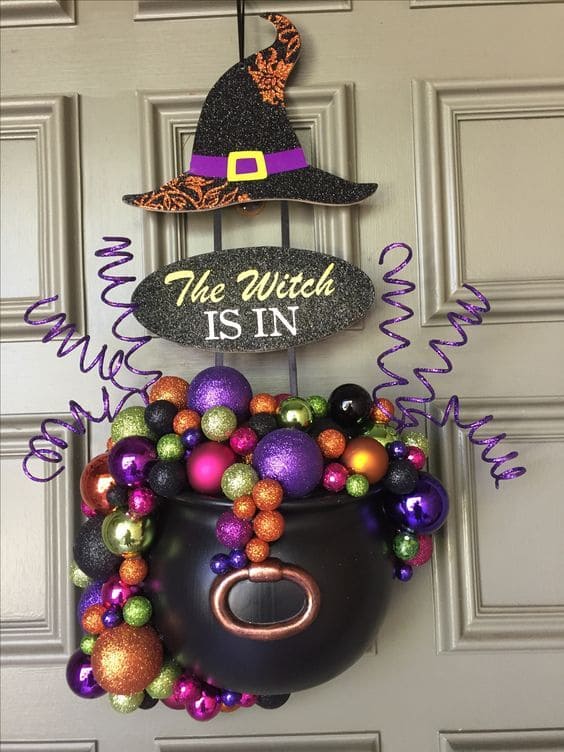
Wow, this playful witchy wreath skips the traditional circle and brews up something delightfully unexpected, a bubbling cauldron bursting with Halloween sparkle.
Plus, the curly pipe cleaner steam adds movement and a touch of whimsy that feels straight out of a magical potion lab.
If you want to make a bold, cheeky statement on your door this Halloween, this wreath is it.
Materials Needed
- Plastic cauldron (10-12″ wide)
- Mixed-size glittery plastic ornaments (approx. 30-40)
- “The Witch Is In” sign (wood or foamboard)
- Witch hat cutout
- Pipe cleaners or wired garland (purple or black)
- Hot glue gun and black ribbon
Step-by-step Guide
Step 1: Hot glue ornaments to the inner and outer rim of the cauldron, overlapping for a bubbling over effect.
Step 2: Twist pipe cleaners into curly steam shapes and attach behind the ornament clusters.
Step 3: Secure the witch sign and hat above the cauldron using ribbon or hot glue, allowing everything to hang vertically.
Step 4: Finish with a loop of black ribbon at the top for easy hanging on your door or wall.
#9. Coraline-Inspired Spooky Wreath
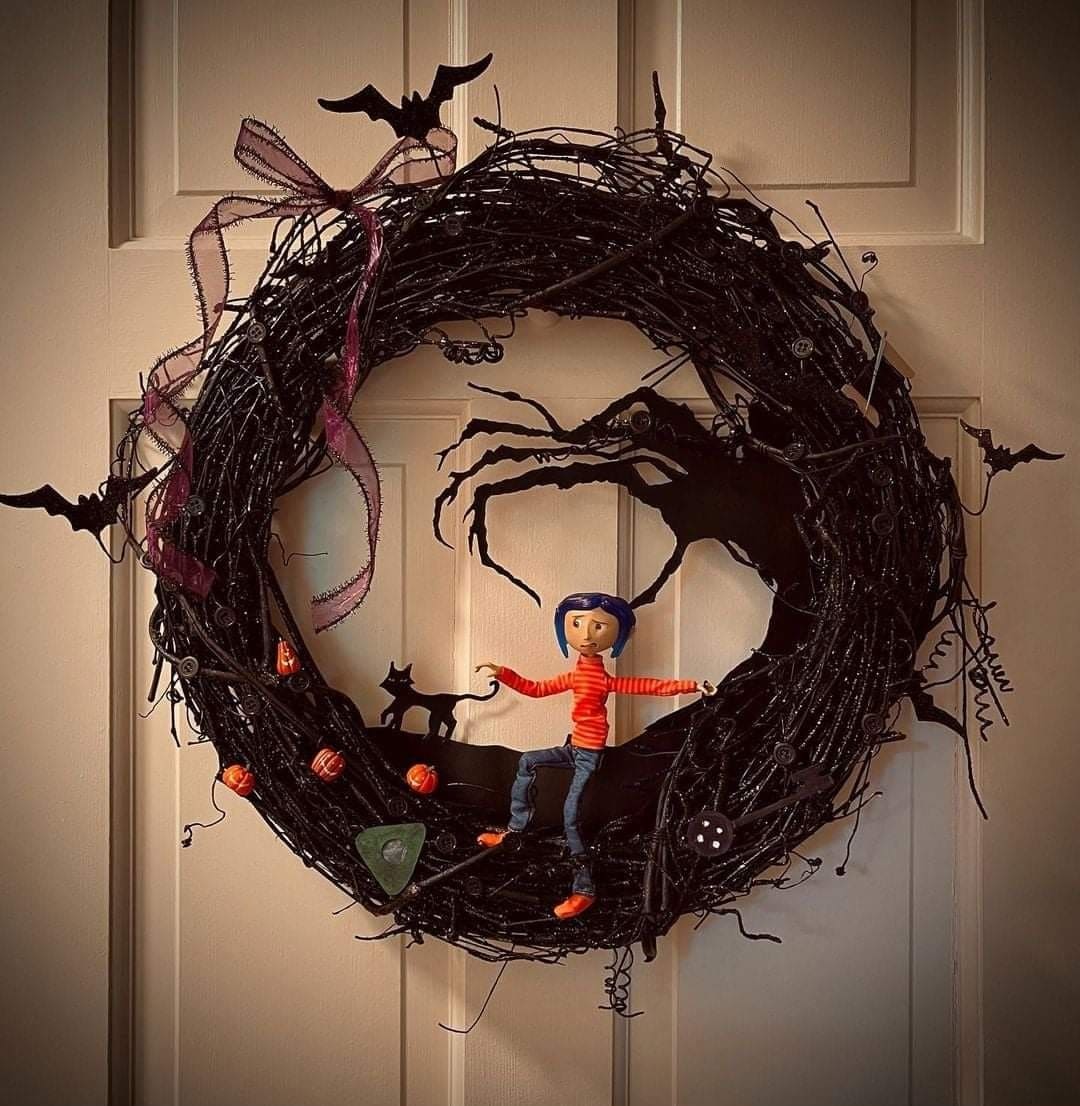
If you’ve ever been captivated by Coraline’s eerie adventures, this wreath will feel like a page right out of the Other World.
Wrapped in black twisted vines, it creates an enchanting portal guarded by bats, a black cat, and the shadowy hand of the Other Mother.
At its center, Coraline herself rests among the elements, bringing a pop of color and a spark of childhood curiosity to the darkness.
Materials Needed
- 1 grapevine wreath (18″) painted black
- Coraline doll or figurine (approx. 6-8″)
- Mini black cat and bat cutouts (foam or felt)
- Craft pumpkins and buttons (varied sizes)
- Cardstock or foam
- Ribbon (black or purple, 1 yard)
- Hot glue gun and black floral wire
Step-by-step Guide
Step 1: Spray-paint the wreath black and let it dry fully before adding embellishments.
Step 2: Position the Coraline doll at the bottom center and glue securely.
Step 3: Add bats, pumpkins, and the cat around the edges for balance and character.
Step 4: Cut out the tree and hand silhouettes and glue them to the inner curve to frame Coraline.
Step 5: Tie on your ribbon bow and attach buttons throughout for that signature Coraline flair.
#10. Monster Wreath with a Wicked Bite
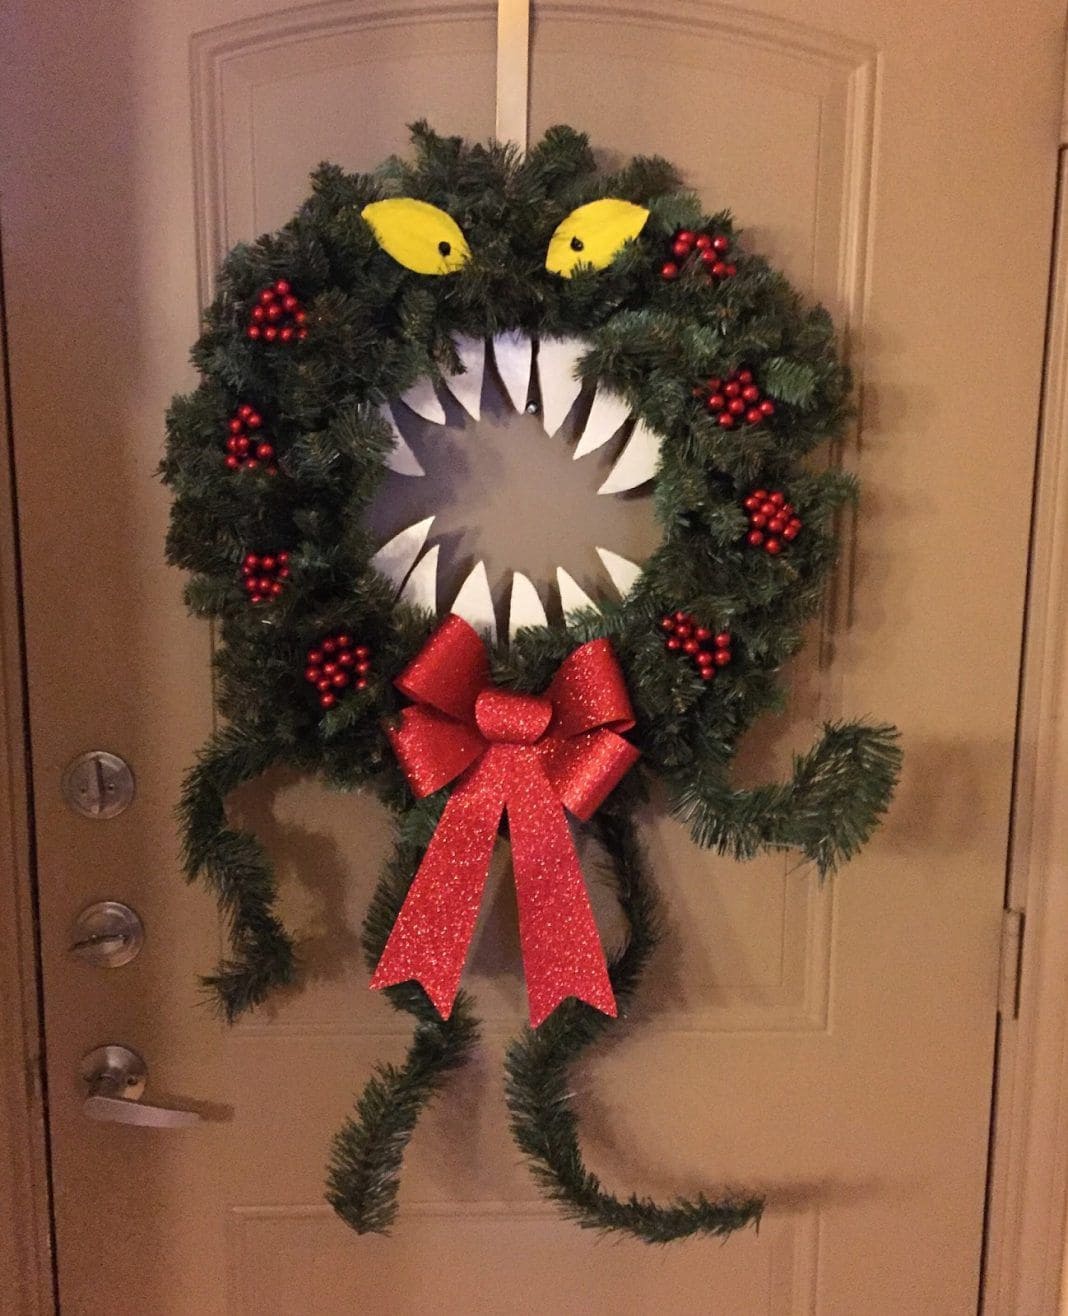
Wow, this mischievous wreath looks like it just leapt out of a haunted forest with a growl. Crafted from classic evergreen garland, it transforms into a wild, snarling creature complete with sharp white fangs, sinister yellow eyes, and curly vine-like arms.
Red berry clusters mimic glowing boils or bloodshot nerves, while the oversized glittery red bow adds a twisted holiday charm.
The personality in this wreath makes it a showstopper for any Halloween-meets-Christmas crossover decor.
Materials Needed
- Artificial pine wreath (18-20″)
- Extra garland (6 ft) for arms and legs
- White cardstock or foam sheet for teeth
- Yellow craft foam for eyes
- Red glitter bow (10-12″)
- Red berry picks (6-8 clusters)
- Hot glue gun and scissors
Step-by-step Guide
Step 1: Cut sharp teeth shapes from white foam and glue them around the wreath’s inner ring.
Step 2: Form two eyes from yellow foam, adding black dots for pupils, then secure to the top edge.
Step 3: Twist extra garland into limbs and attach them to the back or sides for creepy movement.
Step 4: Glue red berry bunches in between greenery for a bold pop and texture.
Step 5: Add the glitter bow at the base for a playful contrast that ties it all together and you are done!
#11. Spiderweb Chic with a Pop of Polka Dots
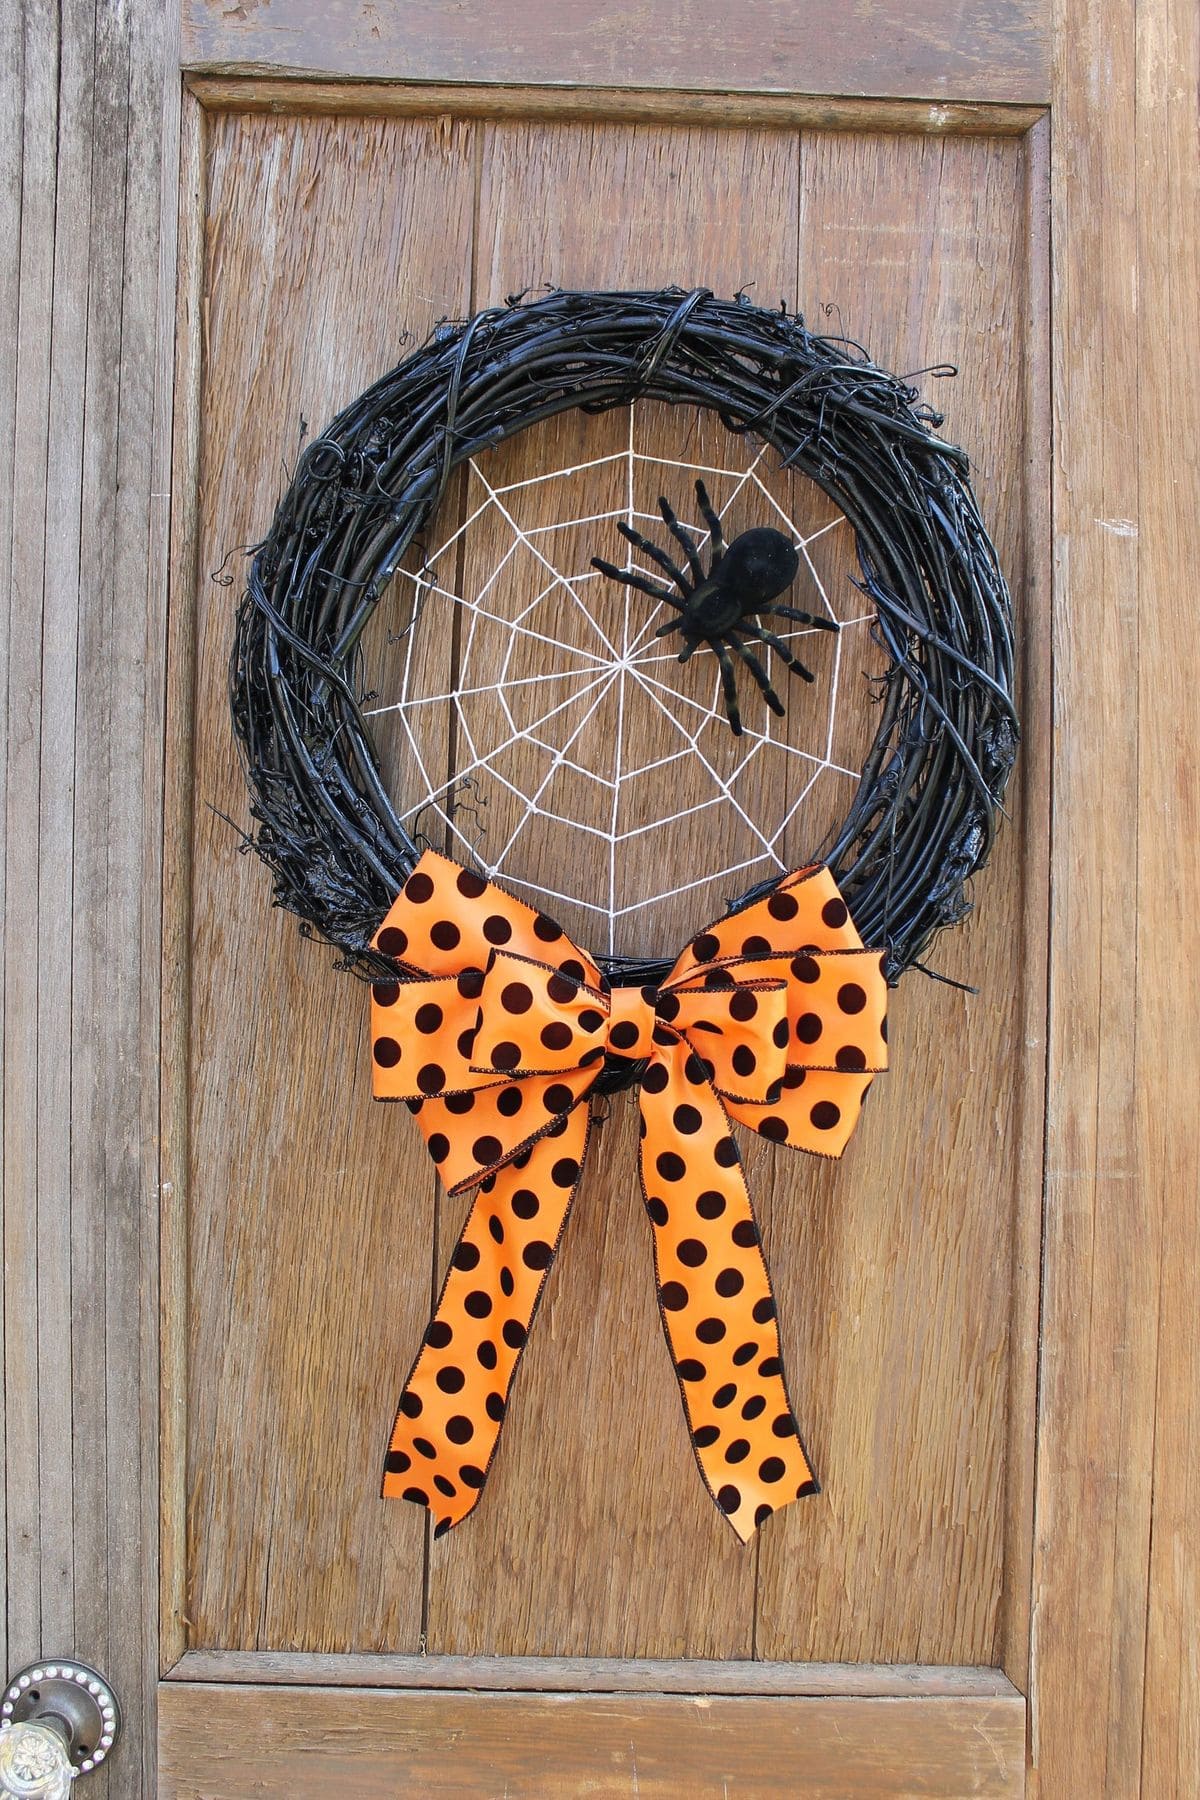
Minimalist yet spooktacular, this wreath keeps things stylish with a jet-black grapevine base wrapped tightly in a symmetrical white string web.
But it’s the oversized orange bow with bold black polka dots that truly steals the show. It brings a playful carnival vibe that softens the creepy-crawly edge.
Perfect for anyone who loves a clean Halloween aesthetic with just enough fright to delight visitors.
Materials Needed
- Black grapevine wreath (16-18″)
- White string (approx. 8 ft)
- Plastic or felt spider (1 large)
- Wide orange ribbon with black polka dots (2.5″ x 3 ft)
- Hot glue gun and scissors
Step-by-step Guide
Step 1: Weave the white string into a spiderweb pattern across the wreath’s center, tying securely at intervals.
Step 2: Glue the spider onto the web where it’s most visible but balanced within the design.
Step 3: Make a large bow with long tails using the polka dot ribbon and attach it to the bottom of the wreath.
Step 4: Finally, add a few glue dots to secure the bow in place so it hangs neatly on the door.
#12. Hello Sidney Scream Wreath
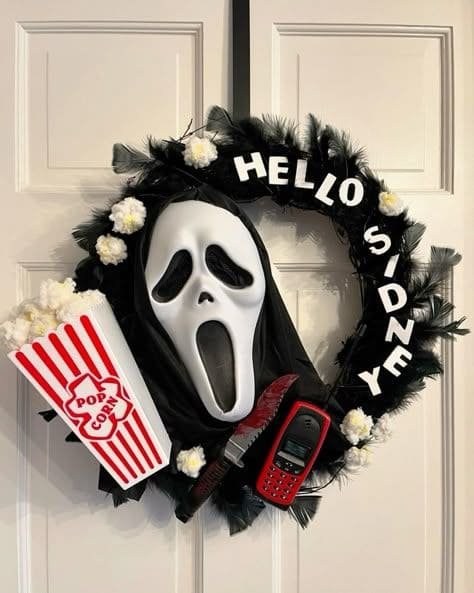
This horror-themed wreath brings a playful twist to your front door, perfect for any movie buff who secretly roots for Ghostface.
Specially, the dramatic “Hello Sidney” text sets the mood instantly, and the scream mask steals the show, surrounded by eerie black feathers and faux popcorn for that creepy cinema vibe.
If you’ve got a soft spot for Halloween classics, this one hits the sweet (and spooky) spot.
Materials Needed
- 1 grapevine or foam wreath (14” diameter)
- 1 plastic Ghostface mask
- 12 black craft feathers (10″ length)
- 1 small plastic knife (around 7″)
- 1 toy flip phone (3-4” size)
- Mini popcorn box (5” tall) + fake popcorn or cotton balls
- White foam letters (around 1.5″ tall)
- Hot glue gun and glue sticks
Step-by-step Guide
Step 1: Start by wrapping the wreath base with black feathers, securing them in place with hot glue until fully covered.
Step 2: Position the Ghostface mask slightly off-center and glue it firmly to the wreath form.
Step 3: Attach the plastic knife and toy phone around the mask, angling them for visual balance and flair.
Step 4: Fill the popcorn box with faux popcorn or cotton balls, then glue it to the bottom left side of the wreath.
Step 5: Finish by gluing the white letters to spell “HELLO SIDNEY” around the top and side edge.
#13. Patterned Paper Cone Wreath with a Cheerful Twist
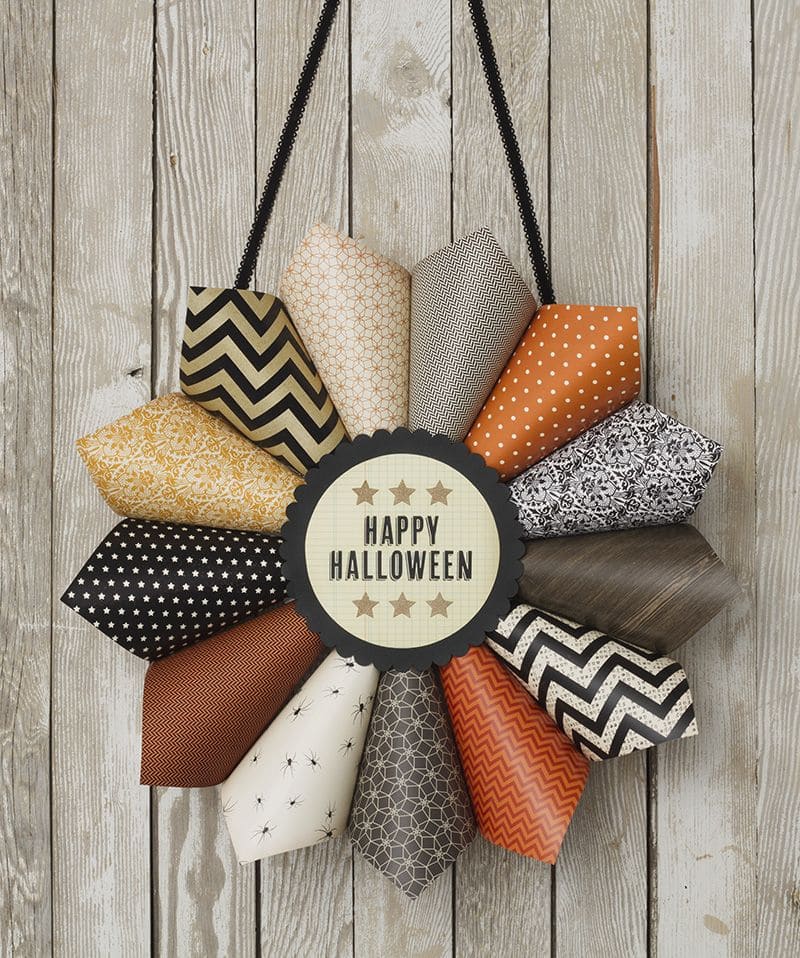
Crafted entirely from colorful patterned scrapbook papers curled into cones, this design forms a perfect circle of festive flair.
From zigzags and polka dots to spiders and stars, each design shouts Halloween in its own playful voice.
At the center, a scalloped label proudly declares “Happy Halloween,” adding a vintage-inspired focal point that ties it all together.
Materials Needed
- Halloween-themed cardstock or scrapbook paper (12-14 sheets, 8″ x 8″)
- Cardboard circle base (10-12″)
- “Happy Halloween” printable or sticker
- Ribbon for hanging (1 yard)
- Hot glue gun and scissors
Step-by-step Guide
Step 1: Roll each paper into a cone and secure with hot glue at the seam.
Step 2: Glue the cones around the outer edge of your cardboard base, evenly spaced and overlapping slightly.
Step 3: Cut and glue a circular center piece, then add your “Happy Halloween” sign on top.
Step 4: Attach a hanging ribbon at the back and display it proudly.
#14. Candy Corn Cat Wreath
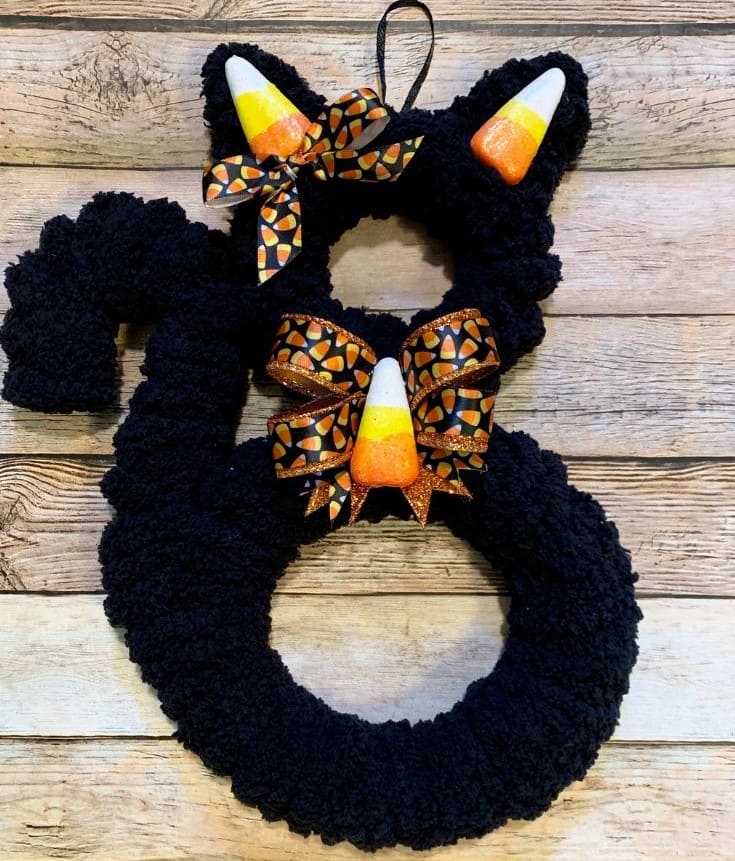
Made entirely from plush black yarn and Dollar Tree supplies, this wreath adds a cozy-meets-playful vibe to your front door.
Its curvy tail and pointy ears give it unmistakable feline flair, while the candy corn bows give a delicious pop of color and fun.
Specially, the texture of the yarn softens the overall look, making it feel like a handmade Halloween hug.
Materials Needed
- 2 wreath forms (8″ and 10″)
- 1 skein of chunky black yarn
- Black pipe cleaners
- 3 faux candy corns
- Halloween ribbon (candy corn print, 1.5″)
- Hot glue gun and scissors
Step-by-step Guide
Step 1: Wrap the larger and smaller wreath forms completely with black yarn until plush and full.
Step 2: Use hot glue or floral wire to attach the two wreaths together in a stacked figure-eight shape.
Step 3: Form ears and a curved tail using black pipe cleaners, wrapping them in yarn, then glue securely.
Step 4: Make two small ribbon bows and attach a candy corn to the center of each.
Step 5: Now, you just glue the bows onto the cat’s neck and head for a fun, finished look.
#15. Glowing Dragon Wreath
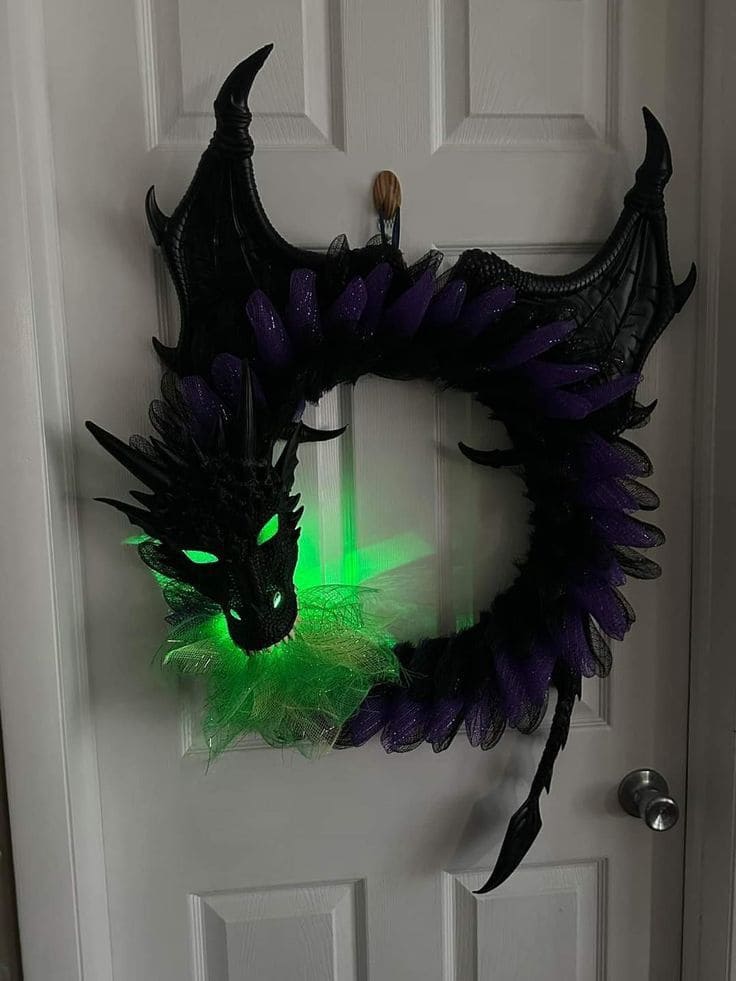
This wreath is pure fantasy-fueled drama. A fierce dragon curves protectively around your door, glowing green eyes piercing through the night like it’s guarding a treasure deep within a dark cave.
Bonus, the textured wings arch outward, giving it a full-bodied silhouette that feels alive.
If you love dragons, villains, or just want something show-stopping, this one will stir every imagination that passes your threshold.
Materials Needed
- 1 foam or wire wreath form (16″)
- Black and purple deco mesh (3-4 rolls)
- Dragon head and tail props (lightweight plastic or foam)
- Plastic dragon wings (approx. 15”-20” span)
- Green LED lights or glow sticks (battery operated)
- Green and black tulle (1 yard each)
- Hot glue gun and wire ties
Step-by-step Guide
Step 1: Wrap the wreath form with alternating layers of black and purple mesh to build the dragon’s coiled body.
Step 2: Attach the wings at the top corners and the tail at the lower right side using wire or zip ties for support.
Step 3: Secure the dragon head to the lower left using hot glue, adjusting the angle so it appears to gaze forward.
Step 4: Tuck in green tulle under the dragon’s head and place green LED lights underneath to create the glowing breath effect.
Step 5: Double-check all attachments and fluff the mesh for dimension. Now you can hang on a hook sturdy enough to support the weight.
#16. Glowing Tulle Beware Wreath
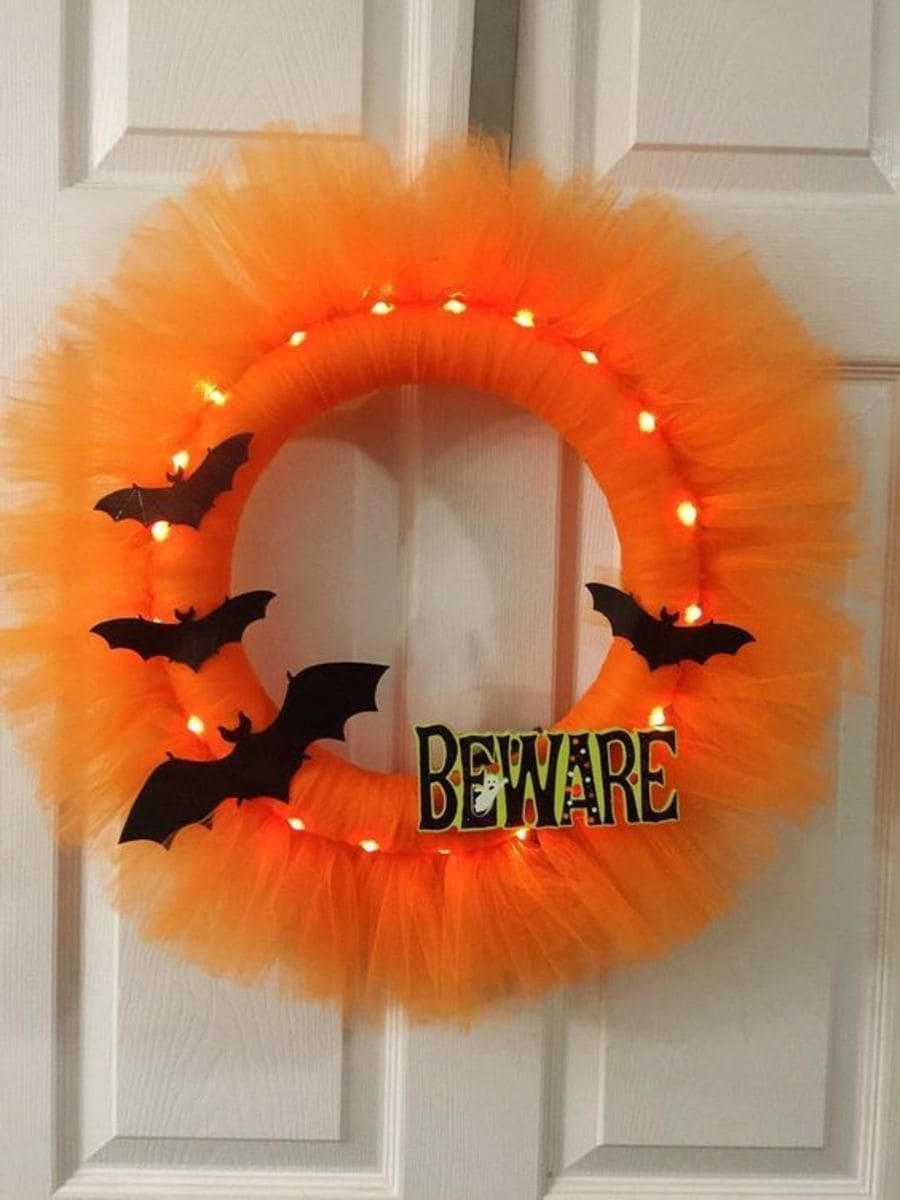
This vibrant wreath screams Halloween fun with its fluffy orange tulle and playful fright.
Wrapped in a burst of volume, the circular base comes alive with tiny orange lights woven through the fluff like embers flickering at twilight.
Also, black bats with dramatic wing spans create motion, while the bold “BEWARE” sign pops at the bottom, adorned with a ghostly wink for a touch of humor.
Materials Needed
- Foam wreath form (12″)
- Orange tulle (about 25-30 yards, cut into 12″ strips)
- Battery-operated orange string lights (1 strand)
- 6-7 black paper bats or pre-cut decals
- “BEWARE” sign (approx. 6″ wide)
- Hot glue or adhesive dots
Step-by-step Guide
Step 1: Knot tulle strips all the way around the foam wreath until full and fluffy.
Step 2: Weave the orange lights in and out of the tulle layer, hiding the battery pack at the back.
Step 3: Secure the bats in place, spacing them to mimic flight across the wreath.
Step 4: Finally, attach the “BEWARE” sign front and center at the bottom edge using glue or clips.
#17. Grim Reaper Halloween Door Wreath
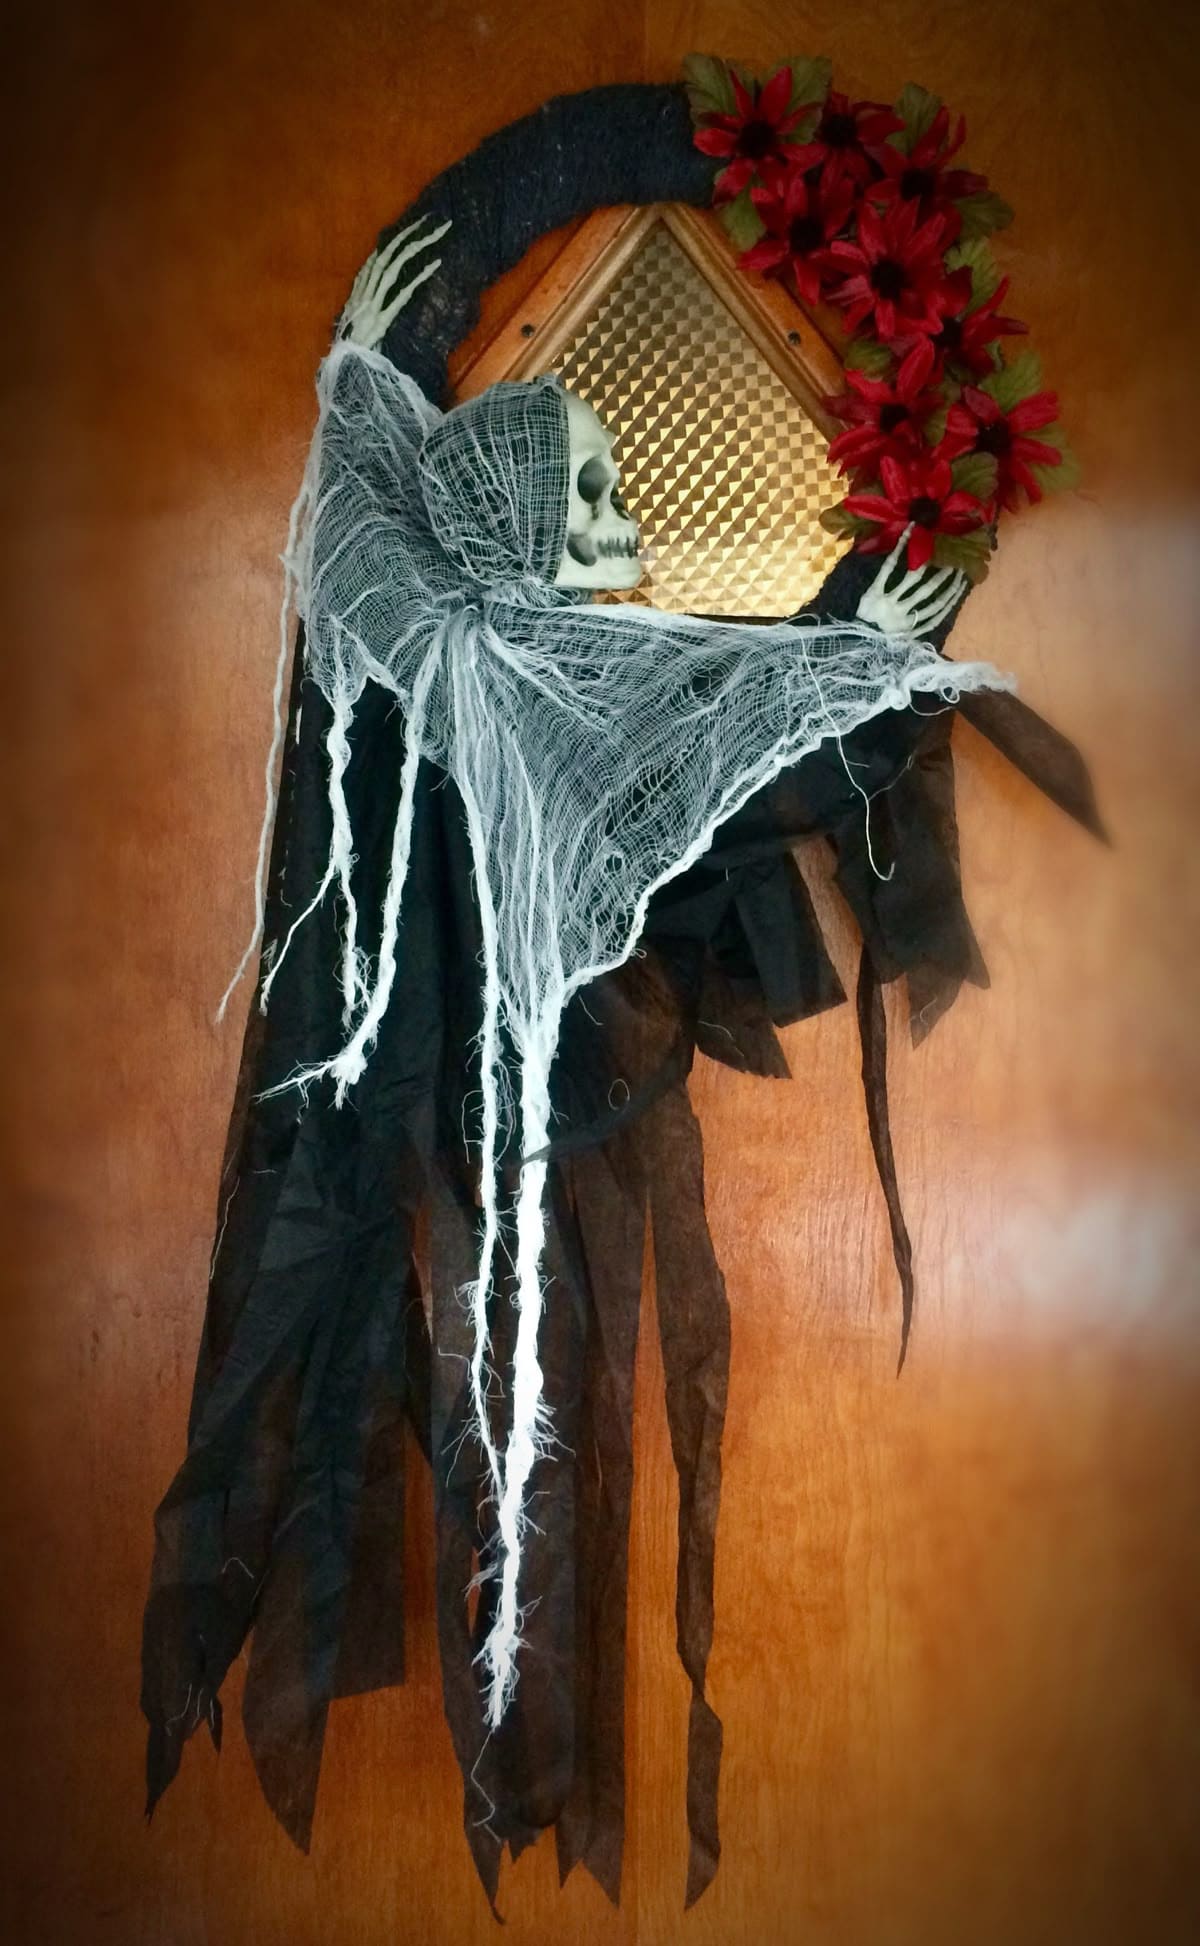
If you want a wreath that stops people in their tracks, this Grim Reaper design is your go-to. It leans fully into the eerie side of Halloween, the gauzy shredded cloak, and skeletal hands reaching outward give it real haunted-house vibes.
The red flowers tucked into one side add an unexpected punch of color, like wilted roses laid on a forgotten grave. T
his one doesn’t whisper spooky, it howls it. Perfect for dimly lit porches or hallway doors that need drama.
Materials Needed
- 1 foam wreath base (14” diameter)
- 1 poseable skeleton or skull with hands (approx. 18”-24” tall)
- 2 yards black gauze fabric
- 2 yards black crepe paper
- 6 faux red flowers with green leaves (3”-4” heads)
- Black ribbon (1” wide, 3 feet long)
- Hot glue gun and glue sticks
- Wire for hanging
Step-by-step Guide
Step 1: Wrap the foam wreath base with black ribbon and secure the ends at the back using hot glue.
Step 2: Position the skeleton skull and arms so they peek over and around the wreath, then attach them securely with hot glue or floral wire.
Step 3: Drape the black gauze around the skeleton figure to create a hooded, ghostly appearance. Let the fabric hang naturally.
Step 4: Add crepe paper or fabric strips to the bottom to create a flowing, tattered effect.
Step 5: Finish by attaching faux red flowers along one side of the wreath for a gothic touch.
#18. Googly-Eyed Ping Pong Wreath

Made entirely of ping pong balls covered in googly eyes, this wreath gives the eerie illusion that you’re being watched from every angle.
A pop of neon green mesh at the top adds a bright, ghoulish twist. It’s light-hearted, hilarious, and perfect for kids or anyone who loves decorating outside the typical pumpkin-and-spiderweb box.
Materials Needed
- Wreath form (foam or wire, 12-14″)
- White ping pong balls (about 100)
- 100-120 googly eyes in assorted size
- Hot glue gun and glue sticks
- Green mesh ribbon (1-2 feet)
- Hanging hook or black ribbon
Step-by-step Guide
Step 1: Attach ping pong balls to the wreath form with hot glue, filling in the entire surface tightly.
Step 2: Glue a googly eye onto each ball, you should mix sizes for a more chaotic, watchful look.
Step 3: Tie or glue the green mesh at the top into a fun, puffy bow for a quirky pop.
Step 4: Add a hanger or loop of ribbon to the back and display on your door.
#19. Bewitching Witch Hat Wreath
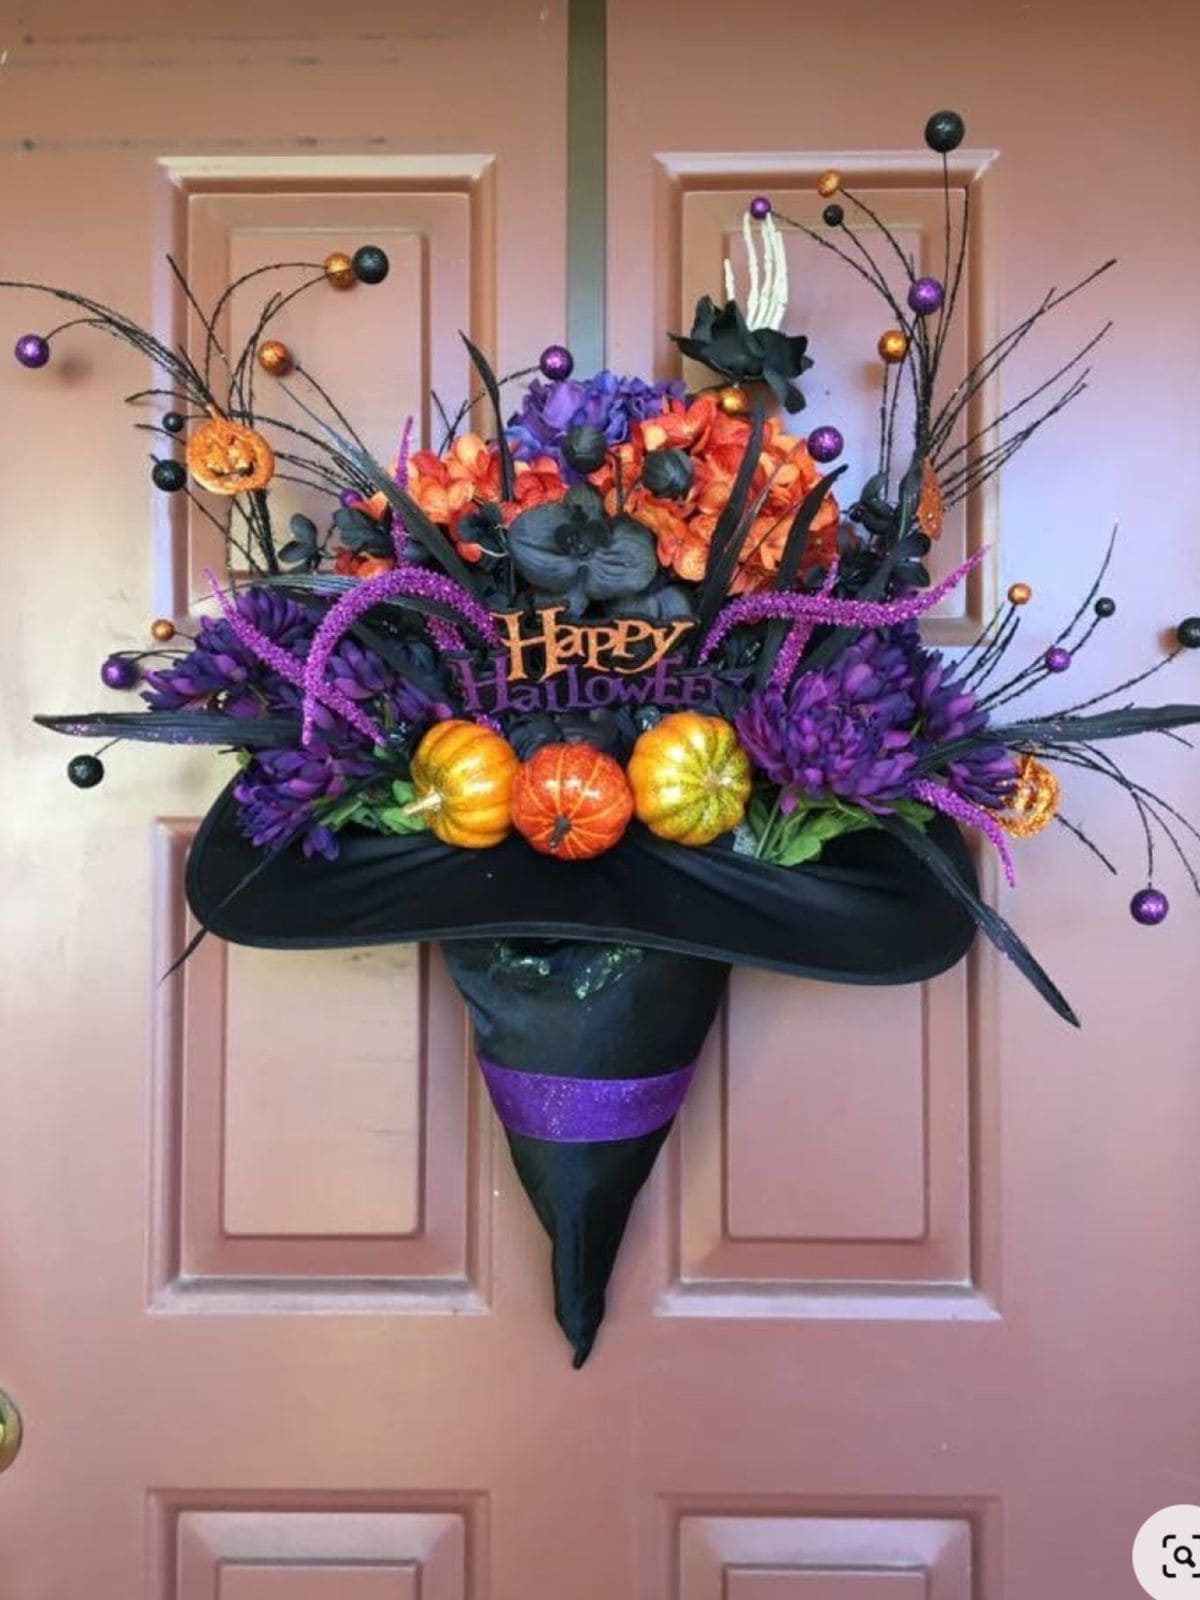
Crafted from an upside-down witch hat, this stunning Halloween wreath transforms into a dramatic statement piece like vibrant with faux pumpkins, purple blooms, and curling stems that reach like enchanted tendrils.
You get that perfect mix of spooky and showy, bold enough to wow trick-or-treaters and party guests alike.
Plus, the glittery purple band adds a touch of glam, while the skeletal hand peeking out brings in just enough eerie flair.
Materials Needed
- 1 oversized witch hat (about 18″ tall)
- 5-7 artificial mini pumpkins (2″-3″)
- 8-10 faux fall flowers (orange, black, and purple)
- 2 bunches of glittery Halloween picks and stems (approx. 18″)
- 1 faux skeleton hand (approx. 6″)
- “Happy Halloween” wood or foam sign
- Hot glue gun & glue sticks
- Floral foam block (3”×4”)
- Wire or hook
Step-by-step Guide
Step 1: Start by stuffing the inside of the witch hat with floral foam to provide a sturdy base for arranging.
Step 2: Insert faux flowers and Halloween picks into the foam, fanning them outward to create a full, whimsical bouquet.
Step 3: Attach pumpkins along the hat brim using hot glue, spacing them evenly for balance.
Step 4: Tuck in the skeleton hand and place the “Happy Halloween” sign front and center for that final magical touch.
Step 5: Finally, secure a hanger or wire loop to the back of the hat for easy mounting on your door.
#20. Adorable Felt Halloween Character Wreath
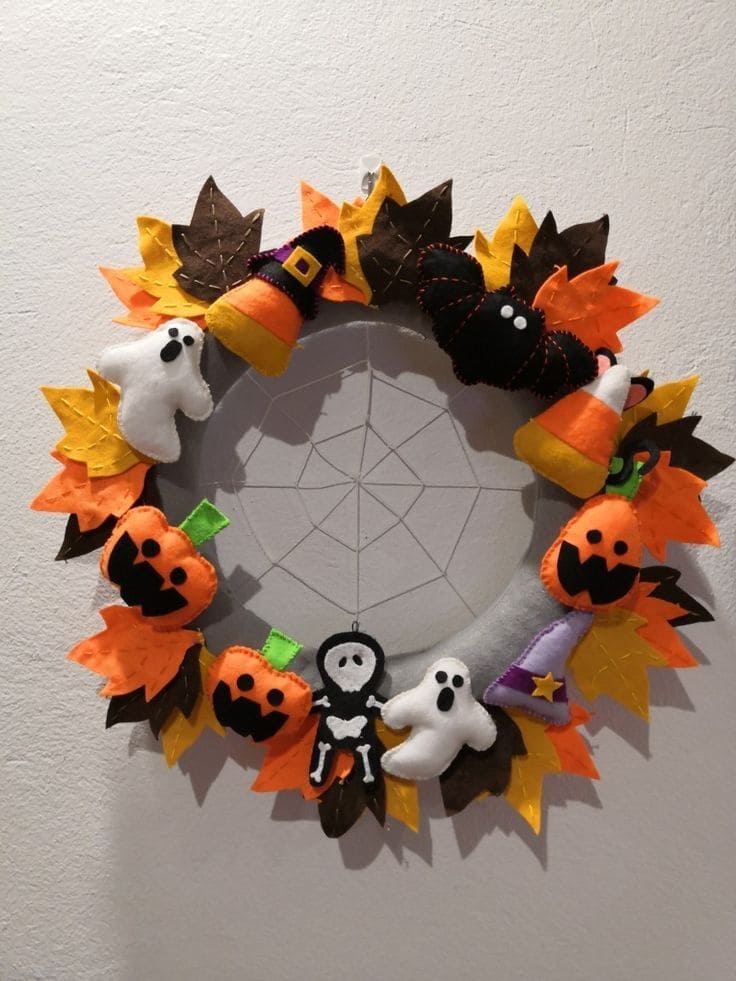
This charming felt wreath brings Halloween to life in the sweetest, most playful way.
With tiny hand-sewn pumpkins, candy corn, ghosts, bats, and even a miniature skeleton, it captures the joy of spooky season without the fright.
Moreover, each colorful character is perched atop warm-toned felt leaves in autumn shades, circling a spiderweb center.
Materials Needed
- Foam or wire wreath base (12″)
- Felt sheets in various colors (black, white, orange, yellow, purple, brown)
- Embroidery thread and needle
- Stuffing (polyfill)
- Hot glue gun
- White yarn
- Scissors and patterns for Halloween shapes
Step-by-step Guide
Step 1: Cut and sew small Halloween figures using felt and embroidery thread, then stuff them lightly for a plush effect.
Step 2: Cut felt leaves and layer them around the wreath form, gluing as you go.
Step 3: Stretch yarn across the center to form a spiderweb and secure in place.
Step 4: Arrange and glue felt characters around the wreath for a balanced, cheerful look.
#21. Bold Orange Yarn Wreath with Giant Spider
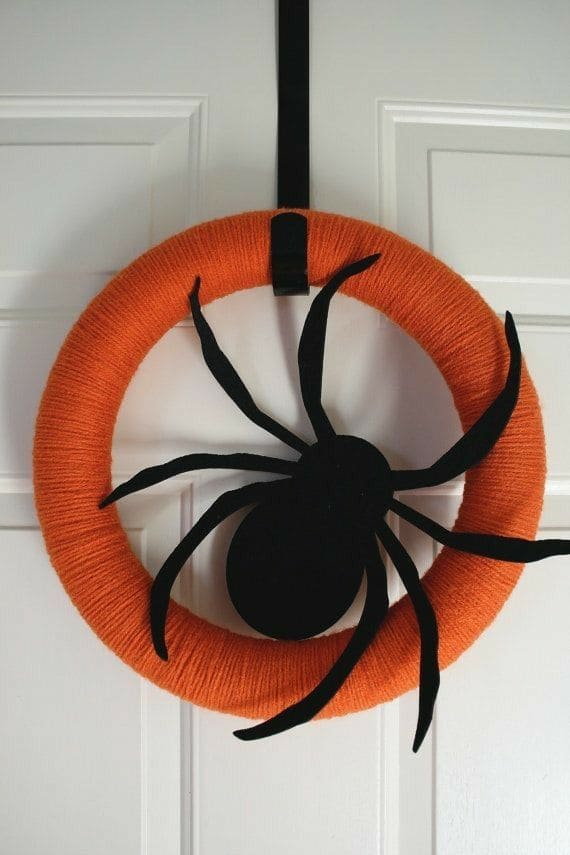
Sometimes simplicity makes the biggest statement and this wreath proves it.
Wrapped in vivid orange yarn, it screams Halloween with one bold focal point: a giant black spider creeping across the middle.
Moreover, the clean color contrast gives off a crisp, modern vibe while still keeping the spooky spirit alive. It’s perfect for those who like their decor to feel intentional and uncluttered, but still full of festive charm.
Materials Needed
- Foam wreath base (12-14″)
- Thick orange yarn (approx. 100 yards)
- Black felts
- Hot glue gun and glue sticks
- Scissors
- Black ribbon
Step-by-step Guide
Step 1: Wrap the entire foam base tightly with orange yarn, making sure there are no gaps.
Step 2: Sketch and cut out a large spider shape from black felt or foam, adjusting leg shapes for a more lifelike effect.
Step 3: Secure the spider to one side of the wreath using hot glue.
Step 4: Finally, add a black ribbon loop for hanging and adjust placement to center the spider.
#22. Colorful Day of the Dead Skull Wreaths
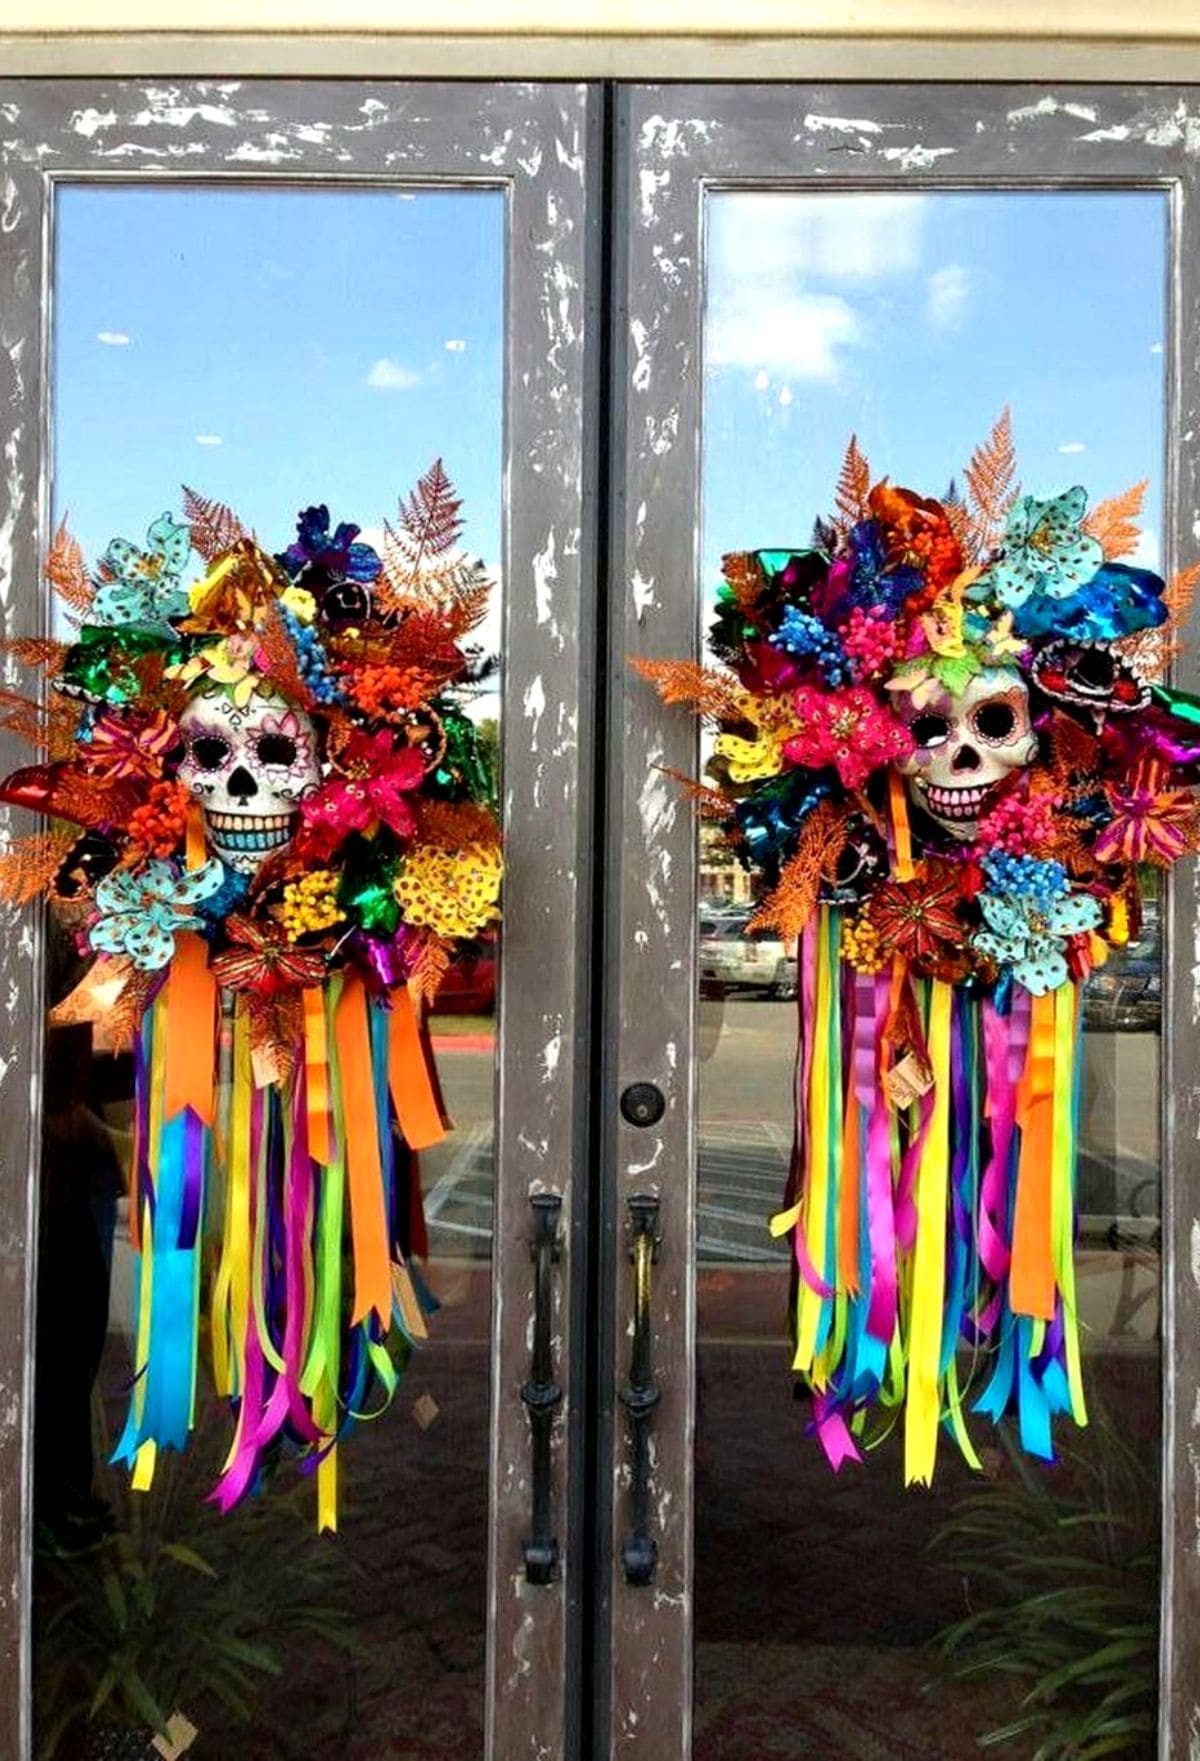
These show-stopping wreaths bring the fiesta to your front door with bold energy and cultural flair.
Inspired by Día de los Muertos, they feature intricately decorated sugar skulls surrounded by a kaleidoscope of shiny metallic flowers, glittering leaves, and a cascade of long satin ribbons.
When paired on double doors like this, they command attention and invite guests into a space filled with spirit and celebration.
Materials Needed
- 2 foam wreath forms (14-16″)
- Artificial glitter leaves and flowers in assorted colors
- Decorative sugar skull masks
- Bright satin ribbons (at least 20 yards total, multiple colors)
- Hot glue gun and floral pins
- Wreath hangers
Step-by-step Guide
Step 1: Secure your wreath form and glue the sugar skull slightly off-center for a dynamic focal point.
Step 2: Surround the skull with faux glitter leaves and layered flowers, tucking and overlapping them generously.
Step 3: Cut ribbons in long strips (24″-36″), then glue or pin them to the bottom backside of the wreath in alternating colors.
Step 4: Fluff, adjust, and trim the ribbons for flow, then repeat for the second wreath if using as a pair.