
Fall is the perfect season to make your home feel warmer, cozier, and a little more inviting. One of my favorite ways to bring that seasonal charm indoors is with a beautiful fall garland. From rustic leaves and pinecones to colorful fabric, pumpkins, dried fruit, and soft lights, there are endless ways to create a display that feels personal.
Whether you prefer farmhouse simplicity or cheerful autumn color, these 20 fall garland ideas offer inspiration for mantels, windows, staircases, porches, and garden spaces. Pick your favorite and start crafting this autumn!
1. Rustic Woodland Leaf & Mushroom Garland

Bring autumn indoors with a rustic garland made from layered paper leaves and charming mushroom shapes. Natural kraft paper, vintage book pages, twine, and warm neutral tones create a cozy woodland character that works beautifully above a garden workspace, porch, or potting shed.
The handmade texture adds seasonal personality while keeping the decoration inexpensive, lightweight, and easy to customize seasonally.
Materials
- Kraft paper or cardstock
- Vintage book pages
- Twine or jute rope
- Scissors
- Pencil
- Glue
- Small wooden clips or clothespins
- Hole punch
Step-by-Step Guide
- Draw several oak and maple leaf shapes on kraft paper.
- Cut out the leaves carefully.
- Trace smaller leaf shapes onto vintage book pages and cut them out.
- Create simple mushroom shapes using kraft paper and book pages.
- Layer the smaller pieces over the larger shapes with glue.
- Punch small holes near the tops of each decoration.
- Thread the pieces onto twine, alternating leaves and mushrooms.
- Hang the finished garland across a wall, shelf, porch, or garden workspace.
2. Colorful Fall Yarn Tassel Garland

Create a cheerful fall tassel garland using chunky yarn in pumpkin, mustard, cream, rust, and berry shades. The soft tassels bring warmth and playful texture to a garden room, covered porch, or seasonal craft corner.
Pair the garland with small pumpkins, pinecones, and autumn foliage for a relaxed harvest display that feels handmade, colorful, welcoming, and wonderfully cozy at home.
Materials
- Chunky yarn in autumn colors
- Twine or cotton cord
- Scissors
- Cardboard
- Small pumpkins
- Pinecones
- Autumn leaves
Step-by-Step Guide
- Choose several coordinating fall-colored yarns.
- Wrap yarn repeatedly around a piece of cardboard.
- Tie the top securely with another piece of yarn.
- Cut through the bottom loops.
- Wrap yarn around the upper section to form the tassel head.
- Trim the ends to create an even fringe.
- Repeat until you have enough tassels for your garland.
- Attach each tassel to twine with even spacing.
- Hang the finished garland and add pumpkins or pinecones nearby.
3. Stitched Fabric Leaf Garland
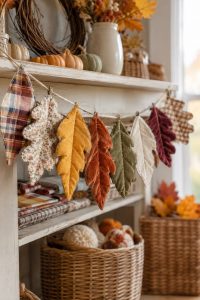
Turn fabric scraps into a charming leaf garland with stitched autumn foliage in plaid, floral, mustard, rust, olive, and cream fabrics. This reusable decoration adds softness and farmhouse character to shelves, garden rooms, porches, or potting areas.
Mixing patterns keeps the arrangement visually interesting, while simple leaf shapes make the project approachable for beginners and easy to personalize beautifully everyone.
Materials
- Fall-colored fabric scraps
- Plaid or floral fabric
- Fabric scissors
- Leaf templates
- Sewing machine or needle and thread
- Twine
- Fabric marker
- Small buttons or beads
Step-by-Step Guide
- Draw or print several different leaf templates.
- Trace the shapes onto your chosen fabrics.
- Cut out pairs of matching leaves.
- Place matching pieces together with the patterned sides facing outward.
- Stitch around the edges, leaving a small opening if desired.
- Add simple stitched veins through the center.
- Attach a small loop of twine to each leaf.
- Tie the leaves along a longer piece of twine.
- Arrange the finished garland across a shelf, porch, or garden room.
4. Vintage Paper Maple Leaf Staircase Garland
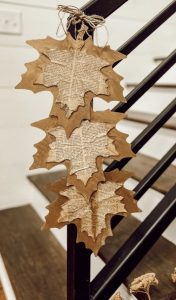
Give a staircase or entryway an autumn makeover with layered maple leaf decorations made from kraft paper and vintage book pages. The overlapping leaves create dimension while natural twine adds a rustic finishing touch.
This inexpensive craft works especially well near a garden entrance, mudroom, or porch, bringing seasonal woodland charm without requiring complicated tools or advanced crafting skills whatsoever.
Materials
- Kraft paper
- Old book pages
- Maple leaf templates
- Scissors
- Pencil
- Glue
- Jute twine
- Small wooden clothespins
- Hole punch
Step-by-Step Guide
- Trace large maple leaf shapes onto kraft paper.
- Cut out several leaves in different sizes.
- Trace smaller leaves onto vintage book pages.
- Cut the book-page leaves carefully.
- Glue the smaller printed leaves onto the kraft-paper leaves.
- Add a few folded edges or light creases for dimension.
- Punch holes near the tops of the leaves.
- Thread twine through the holes.
- Secure the garland along a staircase railing, doorway, or garden entrance.
5. Pumpkin Lantern & Paper Chain Garland
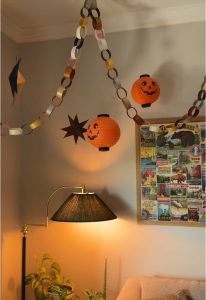
Add playful autumn lighting with colorful paper chains and glowing pumpkin lanterns. Orange lanterns provide a warm seasonal focal point, while linked paper rings create movement and visual rhythm overhead.
Hang the arrangement in a cozy garden room, covered patio, or indoor entertaining space to create an inviting fall atmosphere that feels festive without overwhelming the surrounding seasonal decor nearby.
Materials
- Orange paper lanterns
- Black marker or craft paper
- Colored paper
- Scissors
- Glue or tape
- String or twine
- Battery-operated LED lights
- Ceiling hooks
Step-by-Step Guide
- Prepare several orange paper lanterns.
- Add simple pumpkin faces using black paper or a marker.
- Insert battery-operated LED lights inside the lanterns.
- Cut colored paper into equal strips.
- Form each strip into a loop and secure it with glue or tape.
- Connect the loops together to create long paper chains.
- Attach the chains and lanterns to sturdy string.
- Hang the decoration from ceiling hooks or another secure support.
- Arrange the lanterns at different heights for a playful fall display.
6. Felt Leaf and Wooden Bead Garland

Create a charming autumn garland with felt leaves and unfinished wooden beads for a warm, handmade seasonal display. Burgundy, mustard, olive, and cream create a rich harvest palette that complements rustic interiors and covered garden spaces.
The flexible strand can decorate shelves, tables, porches, or potting areas, while a small candle centerpiece adds inviting warmth and tranquility throughout the season.
Materials
- Felt sheets in burgundy, mustard, olive, and cream
- Unfinished wooden beads
- Twine or jute cord
- Scissors
- Leaf template
- Fabric glue or hot glue
- Battery-operated candle
- Small greenery wreath
Step-by-Step Guide
- Trace several simple leaf shapes onto the colored felt.
- Cut out the leaves and vary their sizes for visual interest.
- Cut a long piece of twine to your desired garland length.
- Thread wooden beads onto the twine, leaving space between groups.
- Fold each felt leaf slightly and attach it between the beads.
- Continue alternating beads and leaves until the strand is complete.
- Tie loops at both ends for easy hanging.
- Arrange the garland around a candle, shelf, or garden workspace.
7. Oversized Painted Paper Leaf Garland
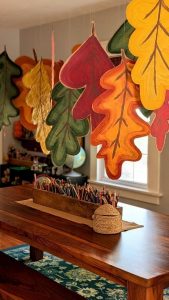
Brighten a fall craft space with oversized painted paper leaves in cheerful autumn colors. Hand-drawn veins give each piece an artistic character, while varied shapes create depth when suspended from the ceiling.
This lightweight decoration works beautifully above a dining table, creative workspace, or covered patio, bringing seasonal movement and color without requiring expensive supplies or complicated techniques for beginners.
Materials
- Heavy cardstock or construction paper
- Acrylic or tempera paint
- Paintbrushes
- Pencil
- Scissors
- Brown marker
- Twine or fishing line
- Tape or ceiling hooks
Step-by-Step Guide
- Draw several large leaf shapes on cardstock.
- Cut out each leaf carefully.
- Paint the leaves in orange, yellow, red, green, and burgundy shades.
- Let the painted pieces dry completely.
- Use a brown marker to draw leaf veins and stems.
- Punch a small hole near the top of each leaf.
- Thread twine or fishing line through the holes.
- Hang the leaves at different lengths from the ceiling.
- Arrange the colors to create a balanced autumn canopy.
8. Woodland Acorn and Squirrel Garland
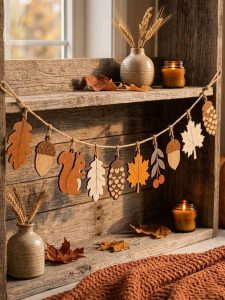
Add woodland charm to a rustic shelf with a handmade garland featuring leaves, acorns, pinecones, berries, and a playful squirrel. Painted wooden shapes provide natural texture and warm autumn colors, while twine keeps the arrangement casual and farmhouse-inspired.
Pair it with dried leaves, candles, and woven baskets to create a welcoming seasonal corner that feels connected to nature throughout autumn.
Materials
- Wooden leaf shapes
- Wooden acorn shapes
- Wooden squirrel cutout
- Wooden or faux pinecones
- Small berry stems
- Acrylic paint
- Twine
- Small hooks or clothespins
- Paintbrushes
Step-by-Step Guide
- Paint the wooden shapes in earthy autumn colors.
- Allow every piece to dry before assembling.
- Add simple details such as leaf veins and acorn caps.
- Cut a length of sturdy twine.
- Tie small loops onto each decorative piece.
- Attach the leaves, acorns, squirrel, pinecones, and berries at intervals.
- Adjust the spacing to create a natural, balanced arrangement.
- Hang the finished garland across a rustic shelf or mantel.
- Add candles and dried foliage around the display.
9. Dried Citrus and Cinnamon Garland

Make a fragrant autumn garland from dried apple, orange, and lemon slices layered with cinnamon sticks and star anise. Natural ingredients create beautiful golden tones while releasing a subtle seasonal aroma.
Hang the finished strand across a shelf, window, porch, or garden room for rustic decoration that combines visual texture, harvest character, and a cozy seasonal atmosphere all autumn long.
Materials
- Dried apple slices
- Dried orange slices
- Dried lemon slices
- Cinnamon sticks
- Star anise
- Jute twine
- Scissors
- Large needle or skewer
- Dried orange peel
Step-by-Step Guide
- Slice apples, oranges, and lemons into thin, even pieces.
- Dry the fruit completely in a low-temperature oven or dehydrator.
- Allow the slices to cool before handling.
- Cut twine to your desired garland length.
- Carefully thread the dried fruit onto the twine.
- Tie cinnamon sticks between groups of fruit slices.
- Add star anise and curled orange peel for extra texture.
- Leave small spaces between each section.
- Hang the finished garland across a shelf, window, or porch.
10. Pumpkin and Berry Kitchen Garland

Turn a kitchen wall into a dramatic autumn focal point with a lush garland of pumpkins, maple leaves, berries, and layered greenery. Combining white, orange, and deep red accents creates rich seasonal contrast across the cabinets.
The dimensional arrangement works especially well above counters or along shelves, instantly making kitchen spaces feel festive, abundant, and welcoming throughout the autumn season.
Materials
- Faux pumpkins in orange and white
- Faux maple leaves
- Faux greenery
- Artificial berry branches
- Floral wire
- Floral tape
- Garland base or grapevine branch
- Hot glue gun
- Command hooks or removable mounting strips
Step-by-Step Guide
- Measure the cabinet or wall area where the garland will hang.
- Prepare a long garland base using greenery or a grapevine branch.
- Arrange large maple leaves along the base.
- Layer orange and white pumpkins throughout the arrangement.
- Add berry branches between the pumpkins and foliage.
- Secure heavier pieces with floral wire.
- Fill empty spaces with smaller leaves and greenery.
- Attach the finished garland securely above the kitchen cabinets.
- Step back and adjust the elements until the display looks full and balanced.
11. Acorn Tassel Garland

Give your fall garden space a woodland-inspired touch with a charming acorn garland. Painted acorns in white, cream, orange, and gold create a cheerful seasonal palette, while natural acorn caps add rustic texture.
Finish the strand with soft white tassels for contrast. Hang it on a garden fence, porch railing, potting shed, or covered outdoor area for an inviting autumn accent.
Materials
- Acorns with caps
- Wooden beads
- Acrylic paint in white, cream, orange, and gold
- White yarn
- Twine or strong cord
- Paintbrush
- Hot glue
- Scissors
- Small drill or awl
Step-by-Step Guide
- Collect clean, dry acorns and separate the caps if needed.
- Paint selected acorn bodies in white, cream, orange, or gold.
- Let the painted pieces dry completely.
- Reattach the acorn caps with a small amount of hot glue.
- Drill or pierce small holes through the pieces if necessary.
- Thread the acorns onto sturdy twine or cord.
- Make a small yarn tassel for each end.
- Secure the tassels to the ends of the garland.
- Hang the finished decoration along a fence, porch, or garden structure.
12. Corn Husk Fence Garland
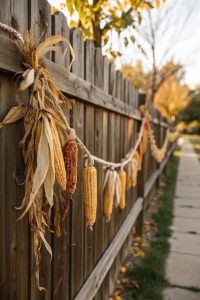
Celebrate harvest season with a natural corn husk and decorative corn garland along a garden fence. Dried husks create graceful movement, while colorful corn cobs introduce golden, cream, and reddish-brown tones.
The arrangement feels wonderfully rustic and seasonal without looking overly polished. It is ideal for dressing up fences, gates, garden entrances, or outdoor entertaining areas during autumn.
Materials
- Dried corn cobs
- Dried corn husks
- Jute rope
- Twine
- Scissors
- Floral wire
- Small hooks
- Optional dried grasses
Step-by-Step Guide
- Choose fully dried corn cobs and husks.
- Gather several husks around each corn cob.
- Tie the husks securely near the top with twine.
- Leave some husk strands loose for a natural appearance.
- Prepare a long piece of jute rope for the garland.
- Attach each corn bundle to the rope using floral wire or twine.
- Space the bundles evenly along the fence.
- Add dried grasses between sections for extra texture.
- Secure the finished garland along the fence using sturdy hooks.
13. Rustic Fall Fabric Ribbon Garland
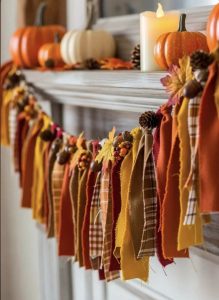
Create an easy fall decoration by tying strips of rustic fabric along a simple garland base. Rich rust, mustard, burgundy, cream, and plaid patterns bring warmth and visual variety to a mantel or covered garden space.
Small pinecones, berries, and leaves add natural accents between the fabric strips, creating a relaxed harvest display with plenty of texture and character.
Materials
- Cotton or linen fabric scraps
- Plaid fabric
- Jute twine or rope
- Faux or dried leaves
- Small pinecones
- Artificial berries
- Scissors
- Floral wire
- Hot glue
Step-by-Step Guide
- Cut fabric scraps into strips of similar width.
- Vary the lengths to create a fuller appearance.
- Tie each strip securely around a long piece of jute.
- Alternate solid colors with plaid patterns.
- Add pinecones, leaves, and berries between fabric sections.
- Secure heavier decorations with floral wire.
- Fluff and separate the fabric strips so they hang naturally.
- Adjust the spacing and color arrangement.
- Display the finished garland across a mantel, shelf, porch, or covered garden area.
14. Rustic Crocheted Pumpkin Garland
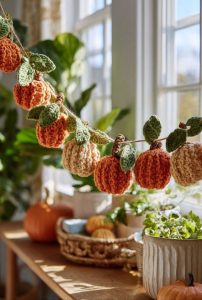
Add handmade charm to a sunny garden room with a crocheted pumpkin garland. Small textured pumpkins in orange, cream, and warm beige create a soft harvest display, while green crocheted leaves give the strand a natural finishing touch.
The decoration works beautifully near windows, plant shelves, potting benches, or covered porches where its cozy texture can complement living greenery.
Materials
- Orange yarn
- Cream or beige yarn
- Green yarn
- Crochet hook
- Twine
- Yarn needle
- Scissors
- Fiberfill stuffing
- Small brown yarn pieces
Step-by-Step Guide
- Crochet several small round pumpkin shapes using orange, cream, and beige yarn.
- Stuff each pumpkin lightly with fiberfill.
- Close the openings and shape the pumpkins into rounded forms.
- Add a small brown yarn stem to each one.
- Crochet simple green leaves for the pumpkin tops.
- Attach the leaves securely around the stems.
- Cut a long piece of twine for the garland.
- Tie each pumpkin evenly along the twine.
- Hang the finished garland near a window, plant display, or garden workspace.
15. Autumn Leaf Light Garland

Combine autumn foliage with warm string lights to create a cozy seasonal garden display. Colorful maple leaves in golden yellow, burnt orange, and deep red hang directly from the illuminated strand, producing a gentle glow after sunset.
This simple arrangement works especially well around a covered porch, garden room, mantel, or outdoor seating area where soft lighting enhances fall evenings.
Materials
- Battery-operated or outdoor-rated string lights
- Faux or preserved maple leaves
- Twine
- Small clips
- Floral wire
- Removable hooks
- Scissors
- Optional dried berries
Step-by-Step Guide
- Choose a string light suitable for the intended indoor or outdoor location.
- Lay the lights flat and determine where each leaf will hang.
- Select leaves in complementary yellow, orange, and red shades.
- Attach each leaf to the light strand using small clips or floral wire.
- Alternate leaf colors for a balanced appearance.
- Add a few dried berries if you want additional seasonal texture.
- Secure the light strand with removable hooks.
- Arrange the leaves so they hang naturally below the lights.
- Turn on the lights at dusk to create a warm autumn glow.
16. Fall Fabric Pennant Garland

Create a cheerful fall garland from fabric pennants in plaid, floral, mustard, rust, burgundy, and cream patterns. The layered flags bring movement and personality to a craft room, covered porch, or garden workspace.
Using fabric scraps makes this project economical and customizable. Mix textures and prints freely to create a welcoming seasonal decoration that can be reused every autumn year.
Materials
- Fall-colored fabric scraps
- Plaid fabric
- Floral fabric
- Jute twine or cotton cord
- Scissors
- Fabric scissors
- Fabric glue or sewing machine
- Pencil
- Paper template
- Ruler
Step-by-Step Guide
- Create a triangular pennant template from cardstock.
- Trace the template onto your selected fabrics.
- Cut out matching or contrasting fabric triangles.
- Arrange the pieces in an alternating fall color pattern.
- Fold the top edge of each pennant over the twine.
- Secure the fabric using fabric glue or stitching.
- Leave equal spacing between each flag.
- Trim loose threads and straighten the pennants.
- Hang the finished garland across a wall, porch, window, or garden workspace.
17. Velvet Bow Fall Garland

Dress a fall mantel or garden room with a simple velvet ribbon garland made from elegant bows. Warm shades of mustard, orange, brown, and olive create a sophisticated harvest palette without looking overly busy. T
his project is quick to assemble and easy to customize. Choose coordinating ribbon widths and textures to create graceful bows that add softness and seasonal character.
Materials
- Velvet ribbon in fall colors
- Satin or grosgrain ribbon
- Jute twine
- Scissors
- Floral wire
- Hot glue gun
- Measuring tape
- Removable hooks
Step-by-Step Guide
- Measure the area where you want to display the garland.
- Cut a piece of jute twine slightly longer than the space.
- Cut several equal lengths of velvet ribbon.
- Form each piece into a neat bow.
- Secure the center of each bow with floral wire.
- Trim the ribbon ends at an angle or into a V shape.
- Attach the bows evenly along the twine.
- Alternate mustard, orange, brown, and olive shades.
- Secure the completed garland across a mantel, shelf, porch, or garden room.
18. Rustic Fabric Ghost Garland

Give your autumn decorating a playful touch with a garland of soft fabric ghosts. Neutral muslin, floral prints, and muted earth tones create a charming farmhouse look rather than an overly spooky display.
Simple round heads and flowing fabric bodies make these decorations approachable for beginners. Hang them across a garden shed, porch, doorway, or indoor seasonal display for Halloween.
Materials
- White or cream fabric
- Floral fabric scraps
- Gauze or muslin
- Small foam balls or cotton stuffing
- Twine
- Black fabric marker
- Scissors
- Small rubber bands or thread
- Needle and thread
Step-by-Step Guide
- Cut squares of fabric large enough to form flowing ghost bodies.
- Place a small foam ball or stuffing in the center.
- Gather the fabric underneath the head.
- Secure the gathered section with thread or a small rubber band.
- Draw two simple eyes on each ghost using a black fabric marker.
- Repeat with different fabric patterns and colors.
- Attach each ghost to a long piece of twine.
- Space the figures evenly along the garland.
- Hang the finished decoration on a porch, garden shed, doorway, or wall.
19. Painted Pinecone Garland
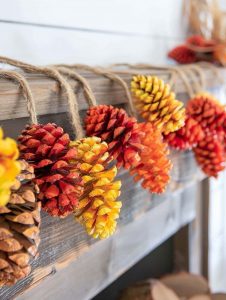
Turn pinecones into a colorful autumn garland by painting their scales in rich shades of red, orange, yellow, and natural brown. The layered texture catches the light beautifully and creates a woodland-inspired accent.
Hang the finished strand across a mantel, garden fence, porch, or potting shed. It is an inexpensive project that transforms ordinary pinecones into charming seasonal decoration.
Materials
- Pinecones
- Acrylic paint
- Paintbrushes
- Jute twine
- Floral wire
- Hot glue
- Scissors
- Clear protective spray
Step-by-Step Guide
- Gather clean, dry pinecones in several sizes.
- Brush away dirt and debris.
- Paint the pinecone scales with red, orange, yellow, or brown acrylic paint.
- Allow each pinecone to dry completely.
- Wrap floral wire securely around the base of each pinecone.
- Attach the wired pinecones to a long piece of jute twine.
- Alternate colors and sizes along the strand.
- Add a light protective coating if the garland will be displayed outdoors.
- Hang it across a mantel, fence, porch, or garden structure.
20. Felt Pumpkin Pie Garland
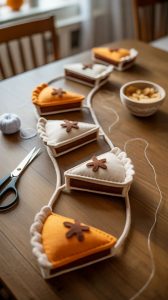
Create a cozy harvest garland using miniature felt or fabric pumpkin-pie shapes decorated with cinnamon-colored star details. Cream, caramel, and pumpkin-orange pieces mimic the comforting colors of autumn baking.
Simple stitching and braided edging give each shape handmade character. String the pieces together for a playful seasonal accent that works beautifully in a kitchen, garden room, or covered porch setting.
Materials
- Orange felt
- Cream felt
- Brown felt
- Embroidery thread
- Cotton stuffing
- Scissors
- Needle
- Twine
- Fabric glue
- Star-shaped cookie cutter or template
Step-by-Step Guide
- Draw triangular pie-slice shapes onto orange and cream felt.
- Cut two matching pieces for each decoration.
- Place a small amount of stuffing between the layers.
- Stitch around the edges using embroidery thread.
- Add a braided or scalloped border for extra texture.
- Cut small brown star shapes from felt.
- Glue or stitch each star onto the pie surface.
- Attach the finished pie pieces to a long piece of twine.
- Space them evenly and display the garland in a kitchen, garden room, or porch.